Meal Prep Ideas
Back to Home Page

Air Fryer Chicken Breast

Make juicy Air Fryer Chicken Breast with simple seasonings in just 15–21 minutes. Perfect for easy dinners, salads, wraps and meal prep!

Golden roasted whole chicken seasoned with herbs on a wooden cutting board.

Get This Recipe Summarized by AI

Ask your favorite AI assistant to summarize this recipe, suggest swaps, or scale it up — one click away.

We copy the prompt to your clipboard too — just paste (Ctrl/Cmd+V) if it doesn't appear automatically.

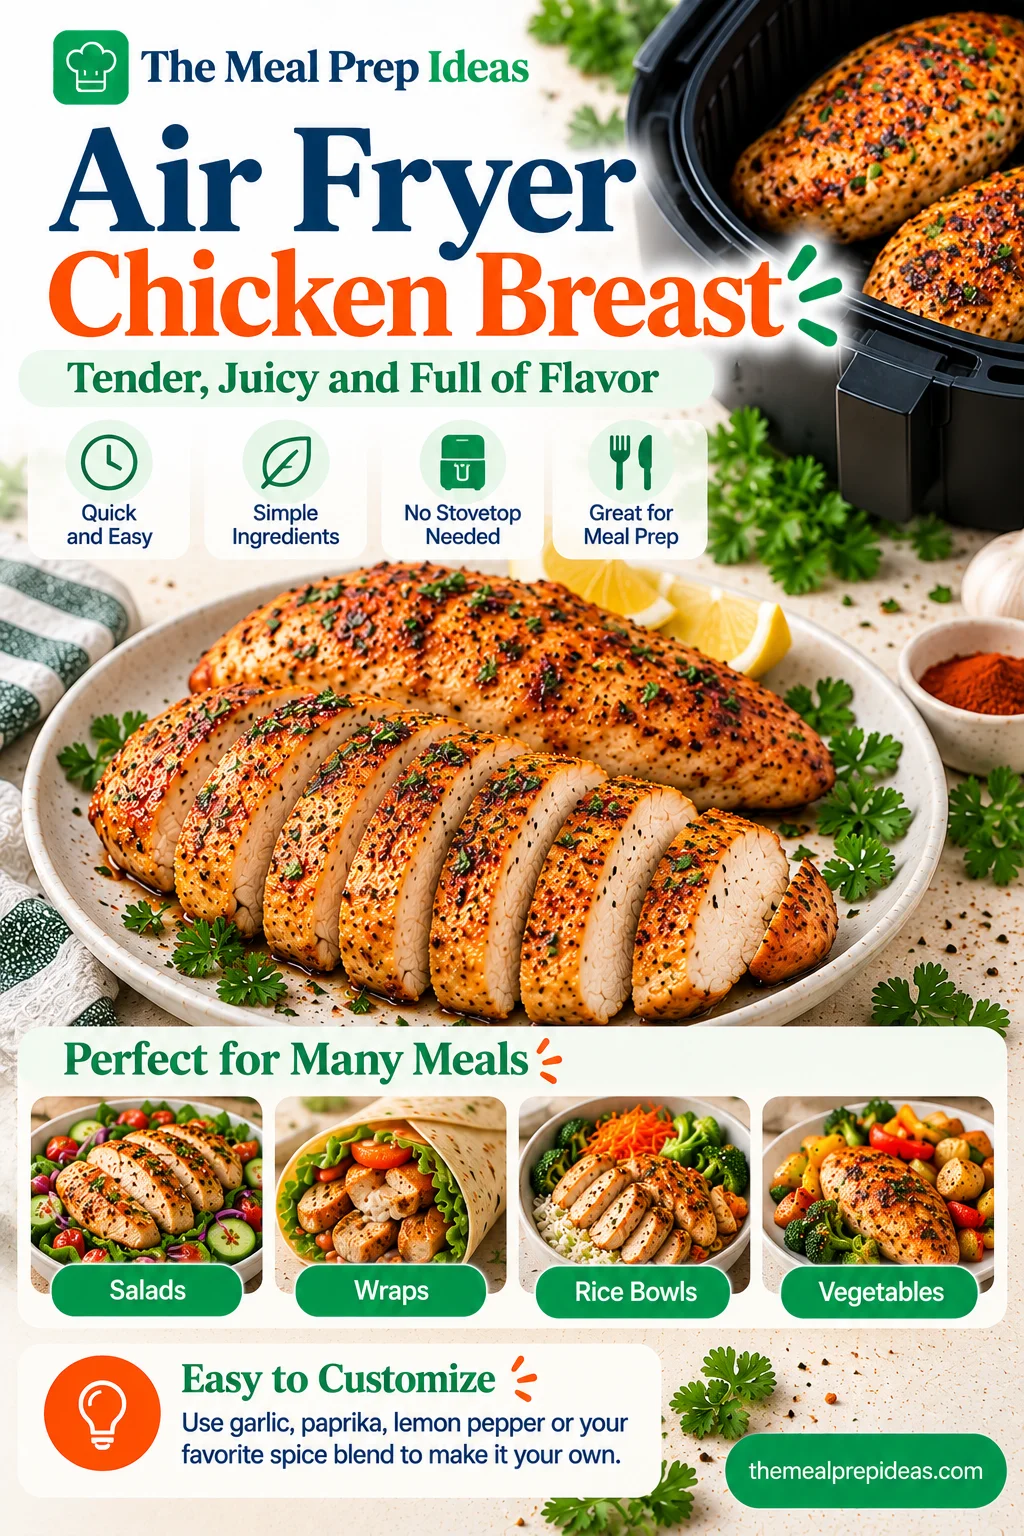
This Air Fryer Chicken Breast recipe is an easy way to make chicken that is tender, juicy and full of flavor. You only need a few everyday ingredients, simple seasonings and an air fryer. There is no need to stand over a hot pan or spend much time in the kitchen. Just season the chicken, place it in the air fryer and let it cook.

The best part of this Air Fryer Chicken Breast recipe is how easily it fits into your daily routine. It is great for a quick weeknight dinner and you can also make extra chicken for lunches throughout the week. Use it in salads, wraps, rice bowls or serve it with your favorite vegetables. You can customize Air Fryer Chicken Breast with garlic, paprika, lemon pepper or your favorite spice blend.

Air Fryer Chicken Breast served sliced with herbs and golden seasoning

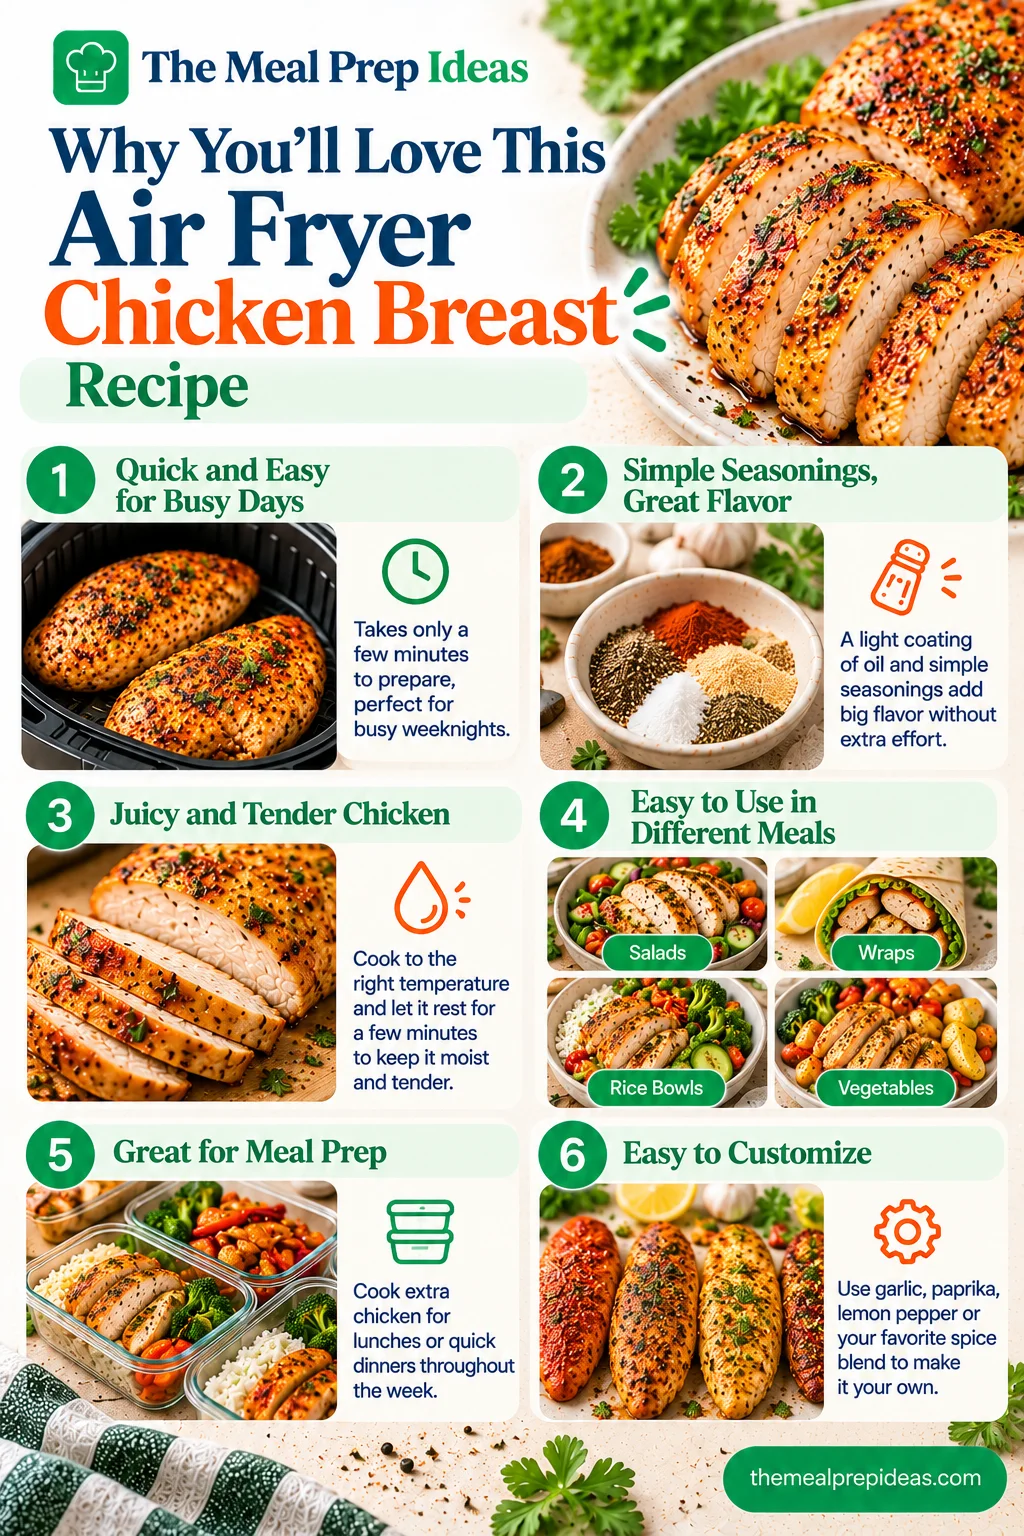
Why You'll Love This Air Fryer Chicken Breast Recipe

This air fryer chicken breast recipe is perfect when you want a tasty meal without spending too much time in the kitchen. It uses simple ingredients, cooks quickly and gives you plenty of ways to serve the chicken. Here are a few reasons to keep this recipe in your weekly meal plan.

  • Quick and easy for busy days: This Air Fryer Chicken Breast recipe takes only a few minutes to prepare, making it a great choice for busy weeknights when you need an easy dinner. 
  • Simple seasonings, great flavor: A light coating of oil helps the seasonings stick to the chicken. Garlic powder, paprika, salt and black pepper add flavor without making the recipe complicated.
  • Juicy and tender chicken: The key to juicy chicken breast is cooking it just until it reaches the right temperature. Check the thickest part with a meat thermometer instead of relying on cooking time alone. Letting the chicken rest for a few minutes also helps keep it moist when you slice it.
  • Easy to use in different meals: Serve the chicken with roasted vegetables and potatoes, slice it over a fresh salad, tuck it into wraps or add it to rice bowls. It is a simple way to prepare an easy weeknight protein that works with many meals.
  • Great for meal prep: Air Fryer Chicken Breast is a convenient lean protein source that fits well into a balanced meal plan. Cook a few extra pieces and use them for lunches or quick dinners throughout the week.
  • Easy to customize: Keep the seasoning mild for everyday meals or add chili powder, lemon pepper or Italian herbs for a different flavor. You can change the seasonings without changing the basic cooking method.

With the right cooking temperature and a little attention to thickness, you can make flavorful chicken that is simple enough for everyday cooking and useful for meal prep. If you enjoy simple chicken recipes with everyday seasonings, Oven-Baked Chicken Breasts are another easy option for a flavorful weeknight dinner.

Air Fryer Chicken Breast with quick cooking, simple seasoning, and meal prep benefits

Ingredients for Air Fryer Chicken Breast

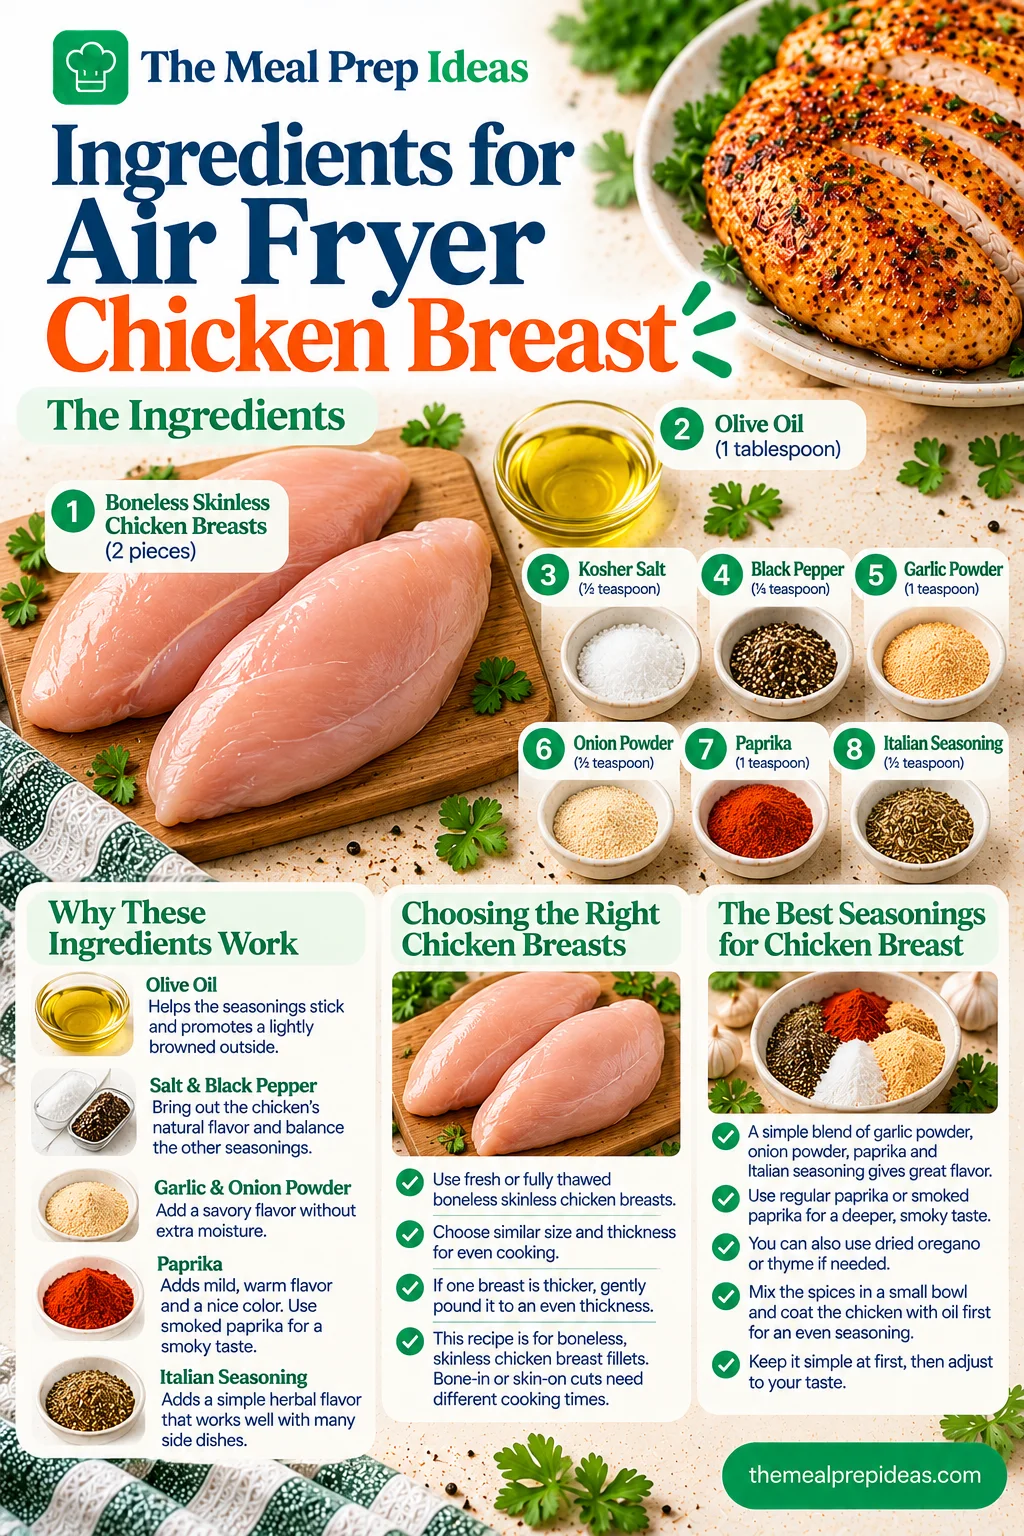
You only need a few simple ingredients to make flavorful, juicy Air Fryer Chicken Breast at home. This recipe uses boneless skinless chicken breasts, a little oil and a basic spice rub that adds flavor without covering up the natural taste of the chicken.

Ingredients

  • 2 boneless skinless chicken breasts (about 6-8 ounces each)
  • 1 tablespoon olive oil (or avocado oil)
  • ½ teaspoon kosher salt
  • ¼ teaspoon black pepper
  • 1 teaspoon garlic powder
  • ½ teaspoon onion powder
  • 1 teaspoon paprika
  • ½ teaspoon Italian seasoning

Why these ingredients work

  • Olive oil: Helps the seasonings stick to the chicken and encourages a lightly browned outside. Avocado oil is a good alternative.
  • Kosher salt and black pepper: Bring out the chicken's natural flavor and balance the other seasonings.
  • Garlic powder and onion powder: Add a savory flavor without the extra moisture that fresh garlic or onion can release.
  • Paprika: Adds a mild, warm flavor and gives the chicken an appealing color. You can use smoked paprika for a light smoky taste.
  • Italian seasoning: Adds a simple herbal flavor that works well with salads, vegetables, wraps and rice bowls.

These ingredients are enough for a tasty everyday meal. You can save other flavor combinations, such as spicy or lemon pepper seasoning, for the variations section later in the recipe.

Choosing the Right Chicken Breasts

For this recipe, use fresh or fully thawed boneless skinless chicken breasts. Boneless, skinless chicken breasts are ideal for Air Fryer Chicken Breast because they are easy to prepare and work well as a lean protein source for everyday meals.

Try to choose chicken breasts that are similar in size and thickness. This helps them cook more evenly, so one piece is less likely to dry out while another is still undercooked.

If one breast is much thicker than the other, place it between two sheets of parchment paper or plastic wrap and gently pound the thickest part with a meat mallet until it is closer to an even thickness. This simple step can help the chicken cook more evenly without drying out the thinner edges.

This recipe is designed for boneless, skinless chicken breast fillets, not bone-in or skin-on cuts. Bone-in chicken usually needs a different cooking time, so avoid using the same timing without adjusting and checking for doneness.

The Best Seasonings for Chicken Breast

A simple chicken seasoning blend is often all you need to give Air Fryer Chicken Breast plenty of flavor. Garlic powder and onion powder add a savory base, while paprika brings mild warmth and color. Italian seasoning adds herbs that pair well with many side dishes.

For this recipe, use regular sweet paprika for a mild flavor. Smoked paprika is another option if you prefer a deeper, smoky taste. You can also use dried oregano or dried thyme if you do not have Italian seasoning.

Mix the spices in a small bowl before adding them to the chicken. Coat the chicken lightly with oil first, then rub the seasoning mixture over all sides. This helps create an even coating, so each bite has a balanced flavor.

Keep the seasoning simple the first time you make the recipe. Once you know how the chicken cooks in your air fryer, you can easily adjust the spice blend to suit your taste.

Raw chicken breasts, olive oil, salt, pepper, garlic powder, paprika, and Italian seasoning

Air Fryer Chicken Breast Recipe

Time

  • Prep Time: 5 minutes
  • Cook Time: 10-16 minutes
  • Total Time: 15-21 minutes
  • Servings: 2

Ingredients

  • 2 boneless, skinless chicken breasts (about 6-8 ounces each)
  • 1 tablespoon olive oil (or avocado oil)
  • ½ teaspoon kosher salt
  • ¼ teaspoon black pepper
  • 1 teaspoon garlic powder
  • ½ teaspoon onion powder
  • 1 teaspoon paprika
  • ½ teaspoon Italian seasoning

Instructions

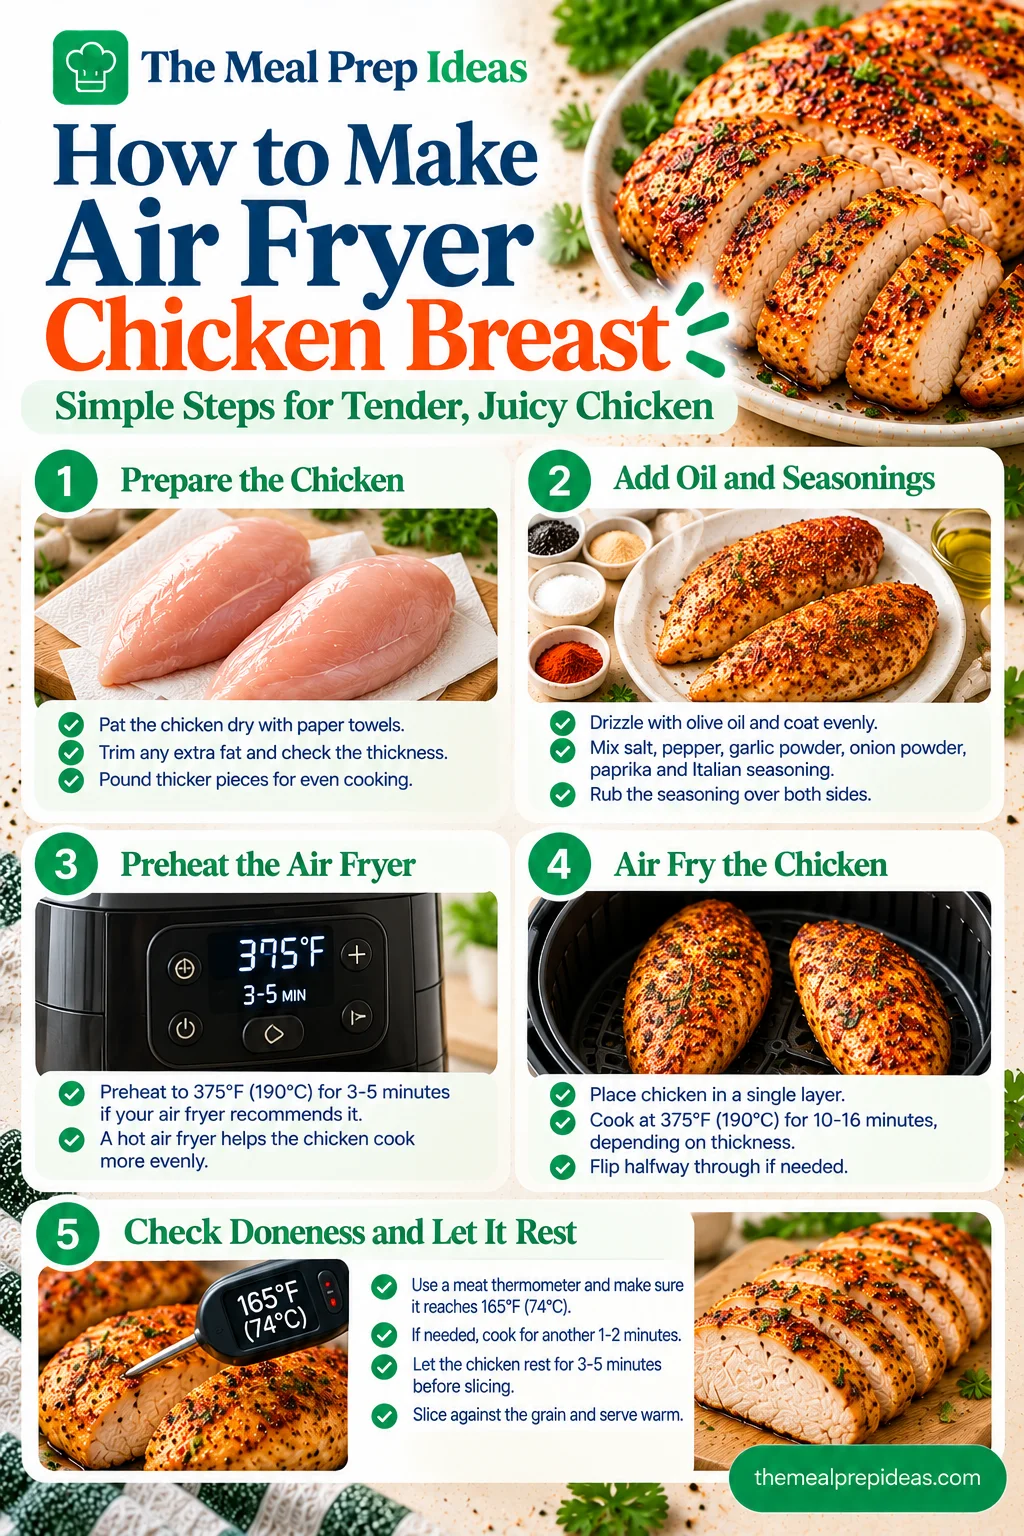
  1. 1Prepare the chicken: Pat the chicken breasts dry with paper towels. Trim any unwanted fat and gently pound thicker areas if needed to create a more even thickness.
  2. 2Add the oil and seasonings: Coat both sides of the chicken with olive oil. Mix the salt, black pepper, garlic powder, onion powder, paprika and Italian seasoning, then rub the mixture evenly over the chicken.
  3. 3Preheat the air fryer: Preheat to 375°F (190°C) for 3-5 minutes if your model recommends preheating.
  4. 4Cook the chicken: Arrange the chicken in a single layer in the air fryer basket, leaving space between the pieces. Cook at 375°F for approximately 10-16 minutes, flipping halfway through.
  5. 5Check the temperature: Insert an instant-read thermometer into the thickest part of each breast. The chicken should reach 165°F (74°C). If needed, cook for another 1-2 minutes and check again.
  6. 6Rest and serve: Transfer the chicken to a clean plate and let it rest for 3-5 minutes before slicing.

Notes

  • Chicken size: These cooking times are a starting point for chicken breasts weighing about 6-8 ounces each. Thicker pieces may need more time, while thinner pieces may cook faster.
  • Air fryer differences: Cooking times vary by model, basket size and how much chicken you cook at once. Avoid overcrowding the basket.
  • Oil substitution: Avocado oil can be used instead of olive oil.
  • Seasoning options: Smoked paprika can replace regular paprika for a deeper flavor. Adjust the seasonings to suit your taste.
  • Food safety: Always check the internal temperature with a meat thermometer rather than relying on appearance or cooking time alone.

Nutrition

Estimated nutrition per serving (one chicken breast with half the oil and seasoning):

  • Calories: Approximately 280
  • Protein: Approximately 43 g
  • Carbohydrates: Approximately 2 g
  • Fat: Approximately 11 g
  • Saturated Fat: Approximately 2 g
  • Sodium: Varies with the salt and chicken used

These values are estimates and can change depending on the size of the chicken breasts and the exact ingredients. Use a nutrition calculator with your final ingredient quantities for more accurate values.

Dietary

  • High-Protein: Chicken breast provides protein to support a balanced diet and makes a useful option for high-protein meal prep.
  • Gluten-Free: The recipe can be gluten-free when the oil and seasonings are free from gluten-containing ingredients. Check packaged seasoning labels if you need to avoid gluten.
  • Dairy-Free: The listed ingredients contain no dairy, provided your packaged seasonings have no dairy-derived additions.
  • Low-Carb: This unbreaded chicken recipe is naturally low in carbohydrates based on the ingredients listed.

How to Make Air Fryer Chicken Breast

Making Air Fryer Chicken Breast is simple, even if you are new to cooking. The key is to prepare the chicken evenly, coat it with oil and seasonings and check the temperature before serving. Follow these steps for tender, juicy chicken breast with a flavorful outside.

Step 1: Prepare the Chicken

Start by patting the chicken breasts dry with paper towels. Removing extra moisture helps the oil and seasonings stick better. If you notice any extra fat or unwanted pieces, trim them off with a sharp knife.

Next, check the thickness of each chicken breast. If one end is much thicker than the other, place the chicken between two sheets of parchment paper or plastic wrap and gently pound the thickest part with a meat mallet. You do not need to make the chicken very thin; just aim for a more even thickness.

This small step helps Air Fryer Chicken Breast cook more evenly because thin edges cook faster than thick centers. When the chicken breast fillets are closer to the same thickness, they are more likely to finish cooking at the same time without the thinner parts becoming dry.

Step 2: Add Oil and Seasonings

Place the prepared chicken in a bowl or on a plate. Drizzle it with the measured olive oil and turn each piece until it has a light coating. You can use avocado oil instead if you prefer.

Mix the salt, black pepper, garlic powder, onion powder, paprika and Italian seasoning in a small bowl. Sprinkle the spice rub over both sides of the chicken, gently rubbing it in so the seasoning covers the surface evenly.

You only need a thin layer of oil to help Air Fryer Chicken Breast brown while keeping the seasoning in place. Too much can leave excess oil in the air fryer basket, while a thick, clumpy seasoning coating may not stick evenly. If you use cooking spray, choose one suitable for your air fryer and follow the manufacturer's instructions.

Step 3: Preheat the Air Fryer

For the most consistent results, preheat your air fryer to 375°F (190°C) for about 3-5 minutes, if your model recommends preheating. Check your air fryer's manual, as some models preheat automatically or do not require a separate preheating step.

Starting with a hot air fryer can help Air Fryer Chicken Breast begin cooking more evenly. However, different air fryer models may heat at slightly different rates, so you may need to adjust the cooking time based on your appliance and the thickness of the chicken.

Step 4: Air Fry the Chicken

Place the seasoned chicken in the air fryer basket in a single layer, leaving a little space between each piece. Avoid stacking the Air Fryer Chicken Breast pieces or overcrowding the basket because hot air needs room to circulate around the meat.

Cook at 375°F (190°C) for approximately 10-16 minutes, depending on the size and thickness of the chicken breasts. For more even cooking, flip the chicken halfway through if your air fryer method calls for it.

Start checking the chicken toward the lower end of the cooking-time range. Smaller or thinner pieces may finish sooner, while thicker breasts may need a few extra minutes. The best air fryer chicken breast cooking time depends on the chicken itself, so do not rely on the clock alone.

Step 5: Check Doneness and Let the Chicken Rest

The most reliable way to check whether your chicken is ready is to use an instant-read meat thermometer. Insert it into the thickest part of the breast, making sure the tip is in the center of the meat.

Chicken breast should reach an internal temperature of 165°F (74°C) to be safe to eat. If it has not reached that temperature, return it to the air fryer and cook for another 1-2 minutes before checking again.

Once the chicken is fully cooked, transfer it to a clean plate and let it rest for about 3-5 minutes before slicing. This gives the juices a little time to settle, helping the meat stay moist when you cut into it.

For the best results, slice Air Fryer Chicken Breast against the grain and serve it warm. You can enjoy it as a main dish or save it for salads, wraps and meal prep bowls.

Air Fryer Chicken Breast prepared with simple seasonings and cooked until juicy

Air Fryer Chicken Breast Cooking Time and Temperature

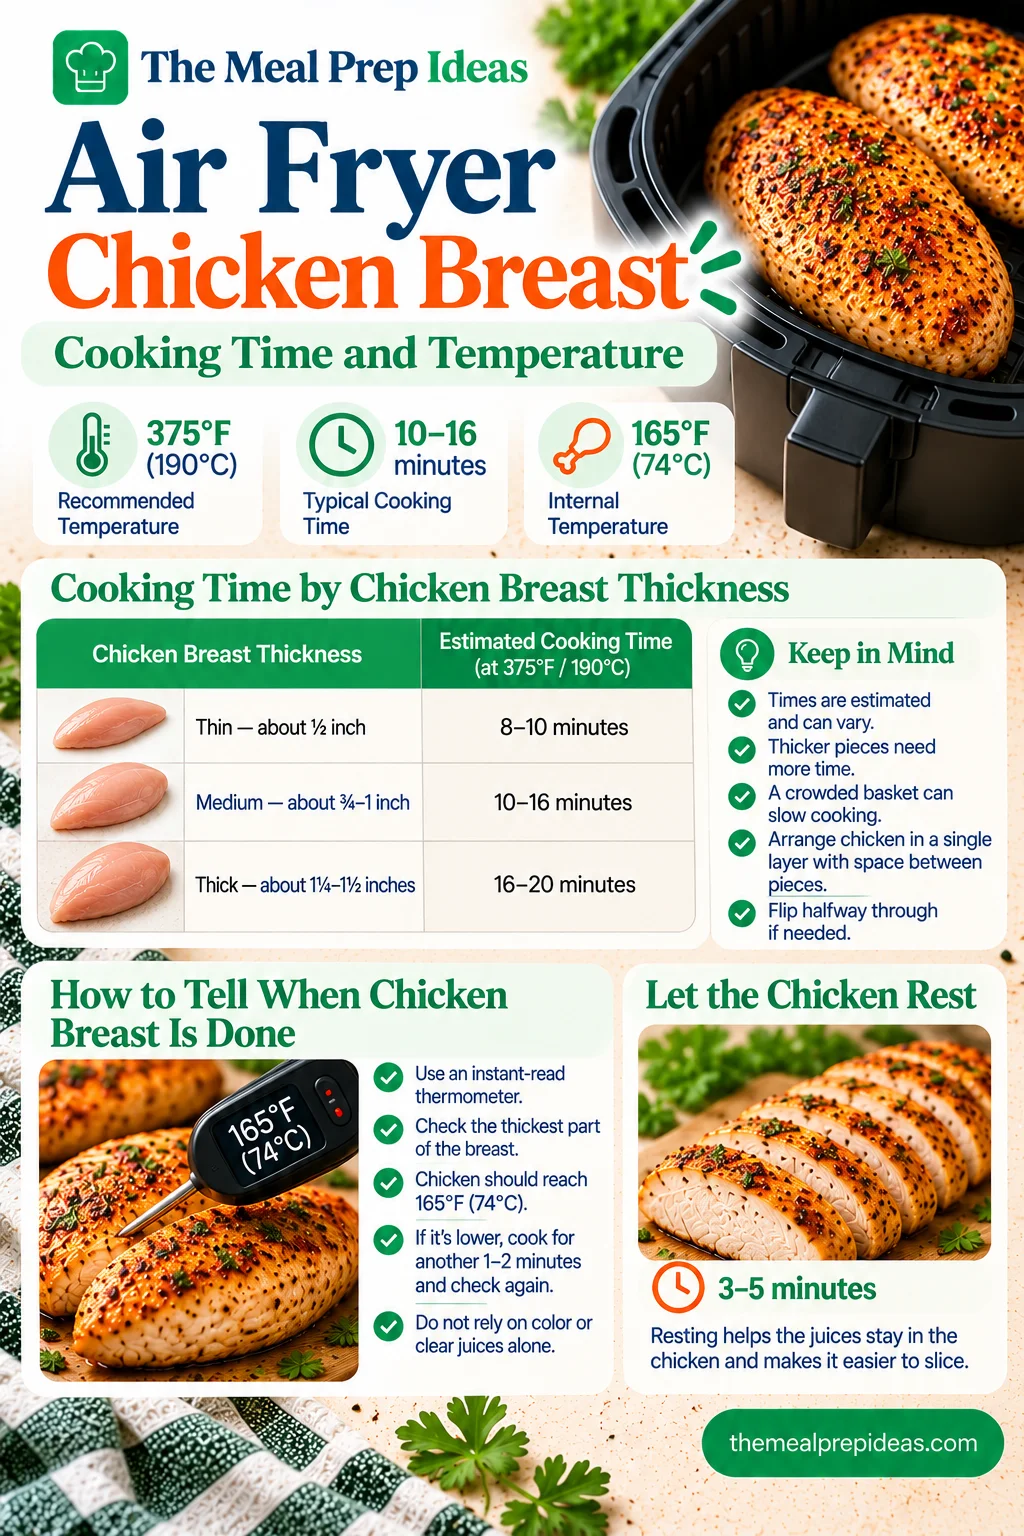
For boneless, skinless chicken breasts, 375°F (190°C) is a good starting temperature for this recipe. Cooking usually takes around 10-16 minutes, but the exact time depends on how thick the chicken is and how your air fryer heats. Thin pieces cook faster, while thicker breasts need more time.

If you are wondering how long to cook Air Fryer Chicken Breast, use the chart below as a guide. Always check the thickest part with a meat thermometer before serving. Chicken is safe to eat when its internal temperature reaches 165°F (74°C).

Cooking Time by Chicken Breast Thickness

The following times are estimated starting points for boneless, skinless chicken breasts cooked at 375°F (190°C). They are not guaranteed times, so check for doneness early and allow extra time if needed.

**Chicken breast thickness****Estimated cooking time**
Thin — about ½ inch8-10 minutes
Medium — about ¾-1 inch10-16 minutes
Thick — about 1¼-1½ inches16-20 minutes

These ranges can vary with the chicken's starting temperature, the size of each piece and the air fryer model. A crowded basket can also slow cooking because hot air cannot move freely around the chicken. Arrange the pieces in a single layer and leave space between them. Flip halfway through if that is part of your cooking method.

You may also see recipes that cook chicken breast at 370°F or 400°F. A higher temperature can shorten the cooking time, but it can also cook the outside faster than the center. For reliable results, stick to one tested temperature and check the internal temperature instead of switching settings based only on the clock.

How to Tell When Chicken Breast Is Done

The safest way to tell when chicken breast is done is to use an instant-read thermometer. Insert the tip into the thickest part of the breast, aiming for the center without touching the air fryer basket.

The chicken should reach an internal temperature of 165°F (74°C). If the reading is lower, return it to the air fryer and cook for another 1-2 minutes, then check again.

Do not rely on color, clear juices or cooking time alone. Chicken can look fully cooked on the outside while the center is still undercooked. A thermometer gives you a much more reliable answer and helps prevent overcooking, too.

Once the chicken reaches 165°F (74°C), transfer it to a clean plate and let it rest for 3-5 minutes before slicing. This brief rest helps keep the chicken moist and makes it easier to serve.

Chicken breast cooking times by thickness at 375°F with a thermometer showing 165°F

Tips for Juicy and Tender Air Fryer Chicken Breast

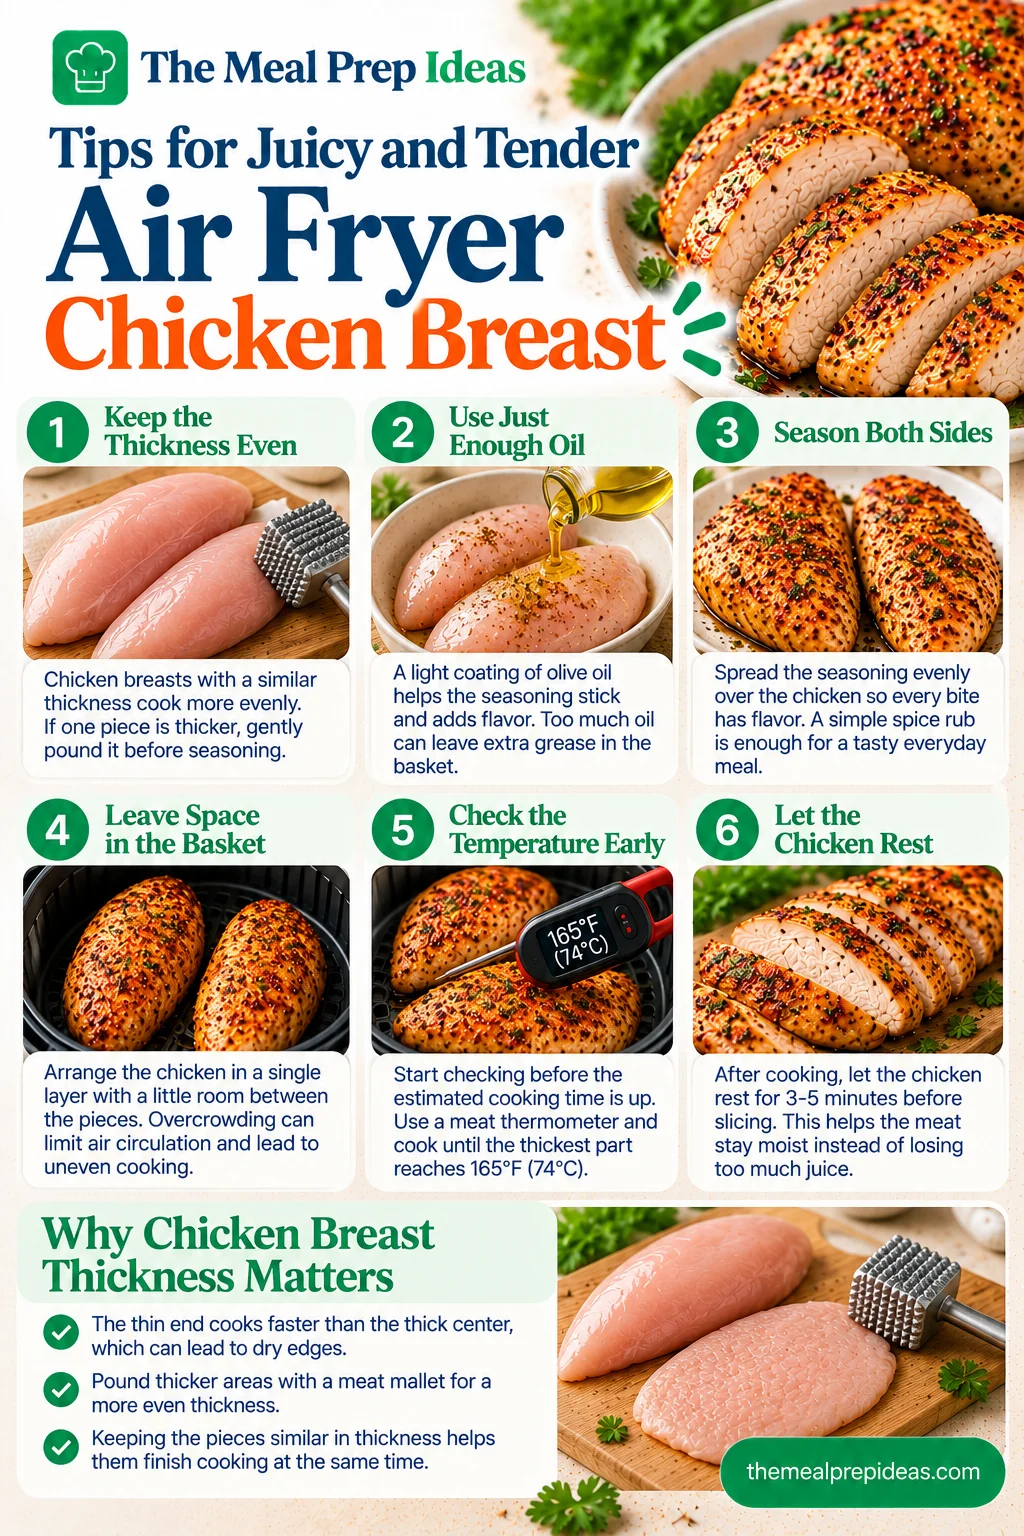
The secret to juicy chicken breast is not complicated. You do not need lots of oil or a long list of ingredients to make juicy Air Fryer Chicken Breast. A few simple steps can help you get tender, flavorful chicken without making it dry or rubbery.

  • Keep the thickness even: Chicken breasts with a similar thickness cook more evenly. If one piece is much thicker than the others, gently pound the thickest part before seasoning.
  • Use just enough oil: A light coating of olive oil helps the seasoning stick and adds flavor. Too much oil is unnecessary and can leave extra grease in the basket.
  • Season both sides: Spread the seasoning evenly over the chicken so every bite has flavor. A simple spice rub is enough for a tasty everyday meal.
  • Leave space in the basket: Arrange the chicken in a single layer with a little room between the pieces. Overcrowding can limit air circulation and lead to uneven cooking.
  • Check the temperature early: Start checking before the estimated cooking time is up. Chicken breast can become dry when it stays in the air fryer for too long. Use a meat thermometer and cook until the thickest part reaches 165°F (74°C).
  • Let the chicken rest: After cooking, leave the chicken on a clean plate for 3-5 minutes before slicing. This helps the meat stay moist instead of losing too much juice as soon as you cut it.

These small habits make it easier to prepare tender chicken breast for dinner, salads, wraps and meal prep without overcomplicating the process.

Why Chicken Breast Thickness Matters

Chicken breast thickness affects cooking time more than many beginners expect. The thin end of a breast cooks faster than the thick center, so the edges can become dry before the middle is fully cooked.

To help prevent this, place the chicken between two sheets of parchment paper or plastic wrap and gently pound the thicker area with a meat mallet. Aim for a more even thickness rather than making the whole breast very thin.

You do not need to make every piece exactly the same size, but keeping them close in thickness helps them finish cooking at a similar time. Use the cooking-time chart above as a starting point, then check each piece with a thermometer. Thicker chicken may need more time, while thinner pieces may be ready sooner.

Sliced chicken breast with tips for even thickness, light oil, and proper resting

Should You Flip Chicken Breast in the Air Fryer?

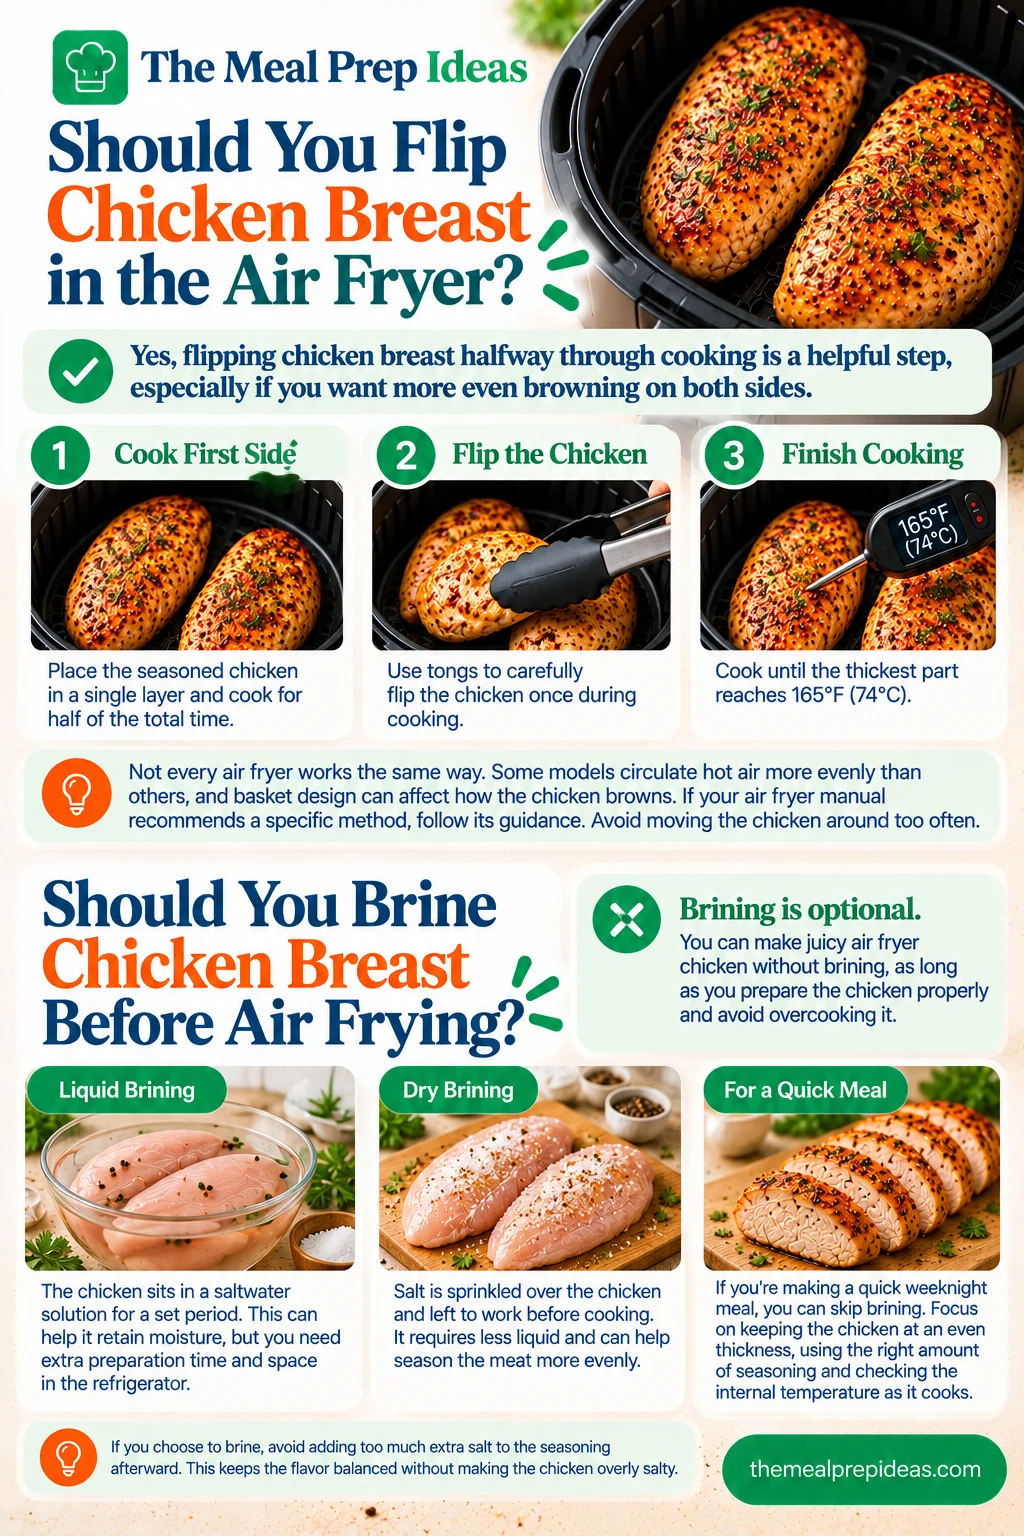
Flipping chicken breast halfway through cooking is a helpful step, especially if you want evener browning on both sides. For this recipe, turn the chicken once during cooking, following the method described in the instructions.

However, not every air fryer works in exactly the same way. Some models circulate hot air more evenly than others and basket design can affect how the chicken browns. If your air fryer manual recommends a particular method, follow its guidance.

When flipping the chicken, use tongs and work carefully around the hot basket. Keep the pieces in a single layer and avoid moving them around too often. The most important thing is to check that the thickest part reaches 165°F (74°C) before serving.

Should You Brine Chicken Breast Before Air Frying?

No, brining chicken breast is optional. You can make juicy air fryer chicken without brining, as long as you prepare the chicken properly and avoid overcooking it.

There are two common ways to brine chicken:

  • Liquid brining: The chicken sits in a saltwater solution for a set period. This can help it retain moisture, but you need extra preparation time and space in the refrigerator.
  • Dry brining: Salt is sprinkled over the chicken and left to work before cooking. It requires less liquid and can help season the meat more evenly.

For a quick weeknight meal, you can skip both methods. Focus on keeping the chicken at an even thickness, using the right amount of seasoning and checking the internal temperature as it cooks.

If you choose to brine, avoid adding too much extra salt to the seasoning afterward. This keeps the flavor balanced without making the chicken overly salty.

Chicken breasts being flipped in an air fryer with a guide to optional brining

Air Fryer Chicken Breast Seasoning and Marinade Variations

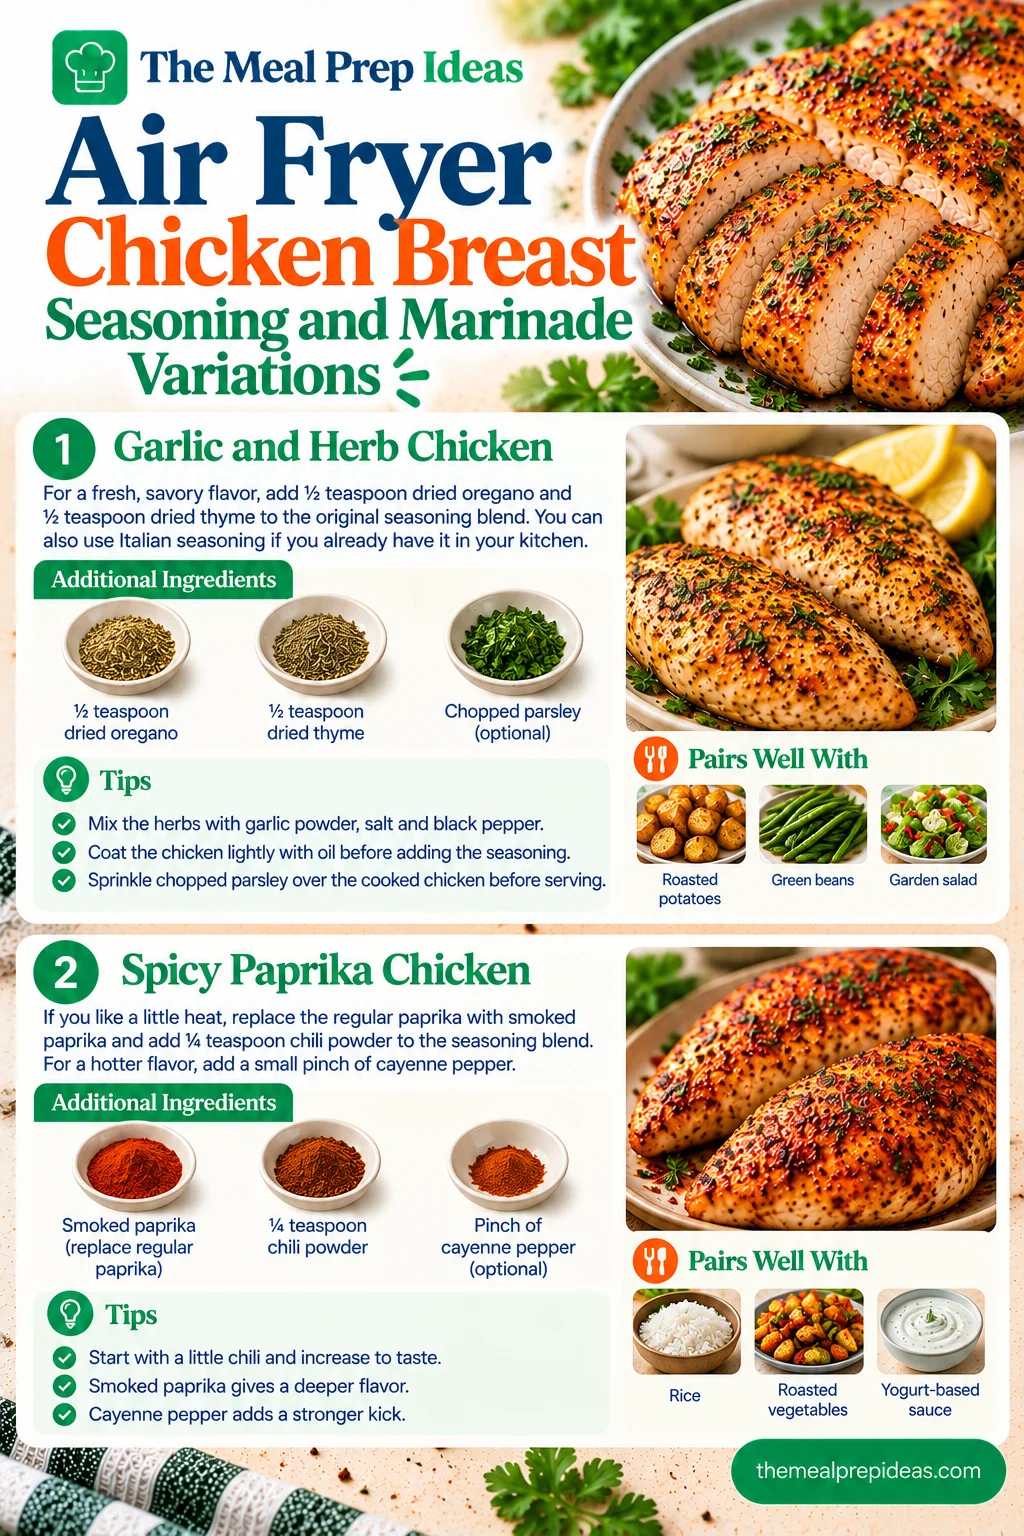
The basic seasoning gives the chicken a simple, savory flavor, but it is easy to change things up when you want something different. These seasoning and marinade variations use everyday ingredients and work well for dinner, salads, wraps and meal prep. Keep the cooking temperature the same as the main recipe and always check that the chicken reaches 165°F (74°C) internally.

Garlic and Herb Chicken

For a fresh, savory flavor, add ½ teaspoon dried oregano and ½ teaspoon dried thyme to the original seasoning blend. You can also use Italian seasoning if you already have it in your kitchen.

Mix the herbs with the garlic powder, salt and black pepper, then coat the chicken lightly with oil before adding the seasoning. If you enjoy fresh herbs, sprinkle a little chopped parsley over the cooked chicken just before serving.

This garlic herb chicken pairs well with roasted potatoes, green beans, steamed vegetables or a simple garden salad. It is also a good choice for meal prep because the mild herb flavor works with many different meals.

Spicy Paprika Chicken

If you like a little heat, replace the regular paprika with smoked paprika and add ¼ teaspoon chili powder to the seasoning blend. For a hotter flavor, add a small pinch of cayenne pepper.

Start with a little chili rather than adding too much at once. You can always increase the heat the next time you make it. Smoked paprika gives the chicken a deeper flavor, while cayenne adds a stronger kick.

Serve this spicy chicken with rice, roasted vegetables or a cool yogurt-based sauce. It also works well sliced into wraps or added to a meal prep bowl.

Garlic herb and spicy paprika seasoning ideas for Air Fryer Chicken Breast

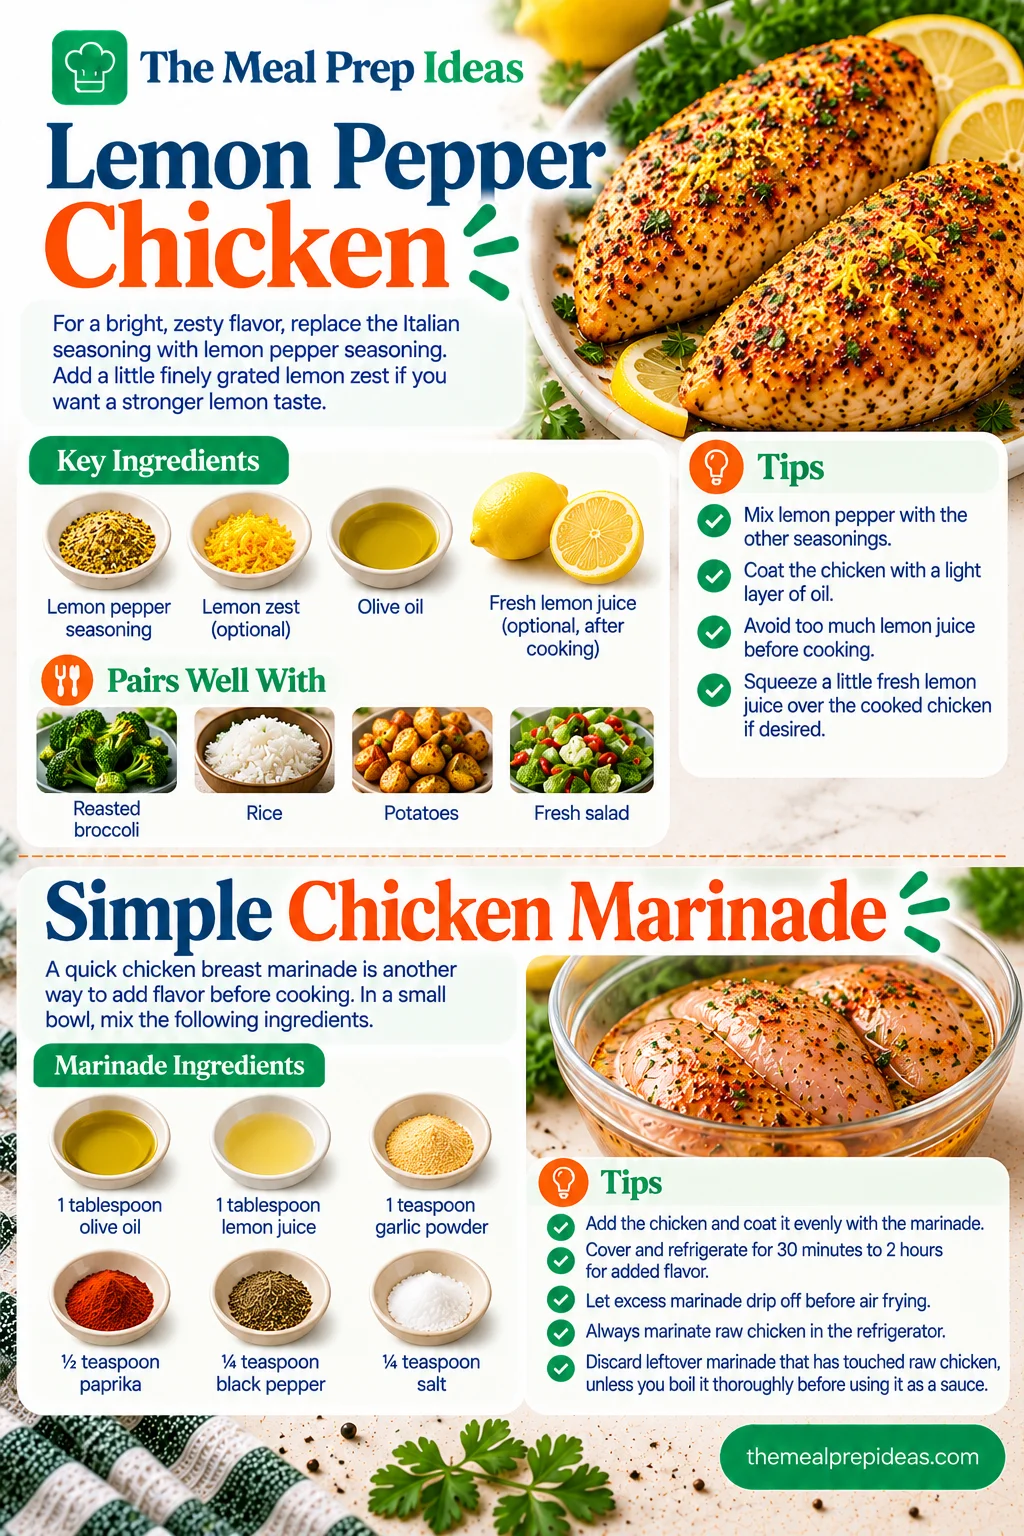
Lemon Pepper Chicken

For a bright, zesty flavor, replace the Italian seasoning with lemon pepper seasoning. Add a little finely grated lemon zest if you want a stronger lemon taste.

Mix the seasoning with the other dry ingredients, then coat the chicken with a light layer of oil so everything sticks. Avoid adding too much lemon juice before cooking, as excess liquid can make the seasoning slide off the chicken.

Once the chicken is cooked, squeeze a little fresh lemon juice over the top if desired. Lemon pepper chicken tastes great with roasted broccoli, rice, potatoes or a fresh salad.

Simple Chicken Marinade

A quick chicken breast marinade is another way to add flavor before cooking. In a small bowl, mix the following ingredients:

  • 1 tablespoon olive oil
  • 1 tablespoon lemon juice
  • 1 teaspoon garlic powder
  • ½ teaspoon paprika
  • ¼ teaspoon black pepper
  • ¼ teaspoon salt

Add the chicken and coat it evenly with the marinade. Cover and refrigerate for 30 minutes to 2 hours for added flavor. This marinating time is separate from the cooking time. Before air frying, let excess marinade drip off so the chicken is not too wet.

Always marinate raw chicken in the refrigerator, never on the counter. Discard leftover marinade that has touched raw chicken, unless you boil it thoroughly before using it as a sauce. Cook the chicken using the main recipe's method and check the thickest part with a thermometer.

Lemon pepper chicken with fresh lemon and a bowl of garlic marinade

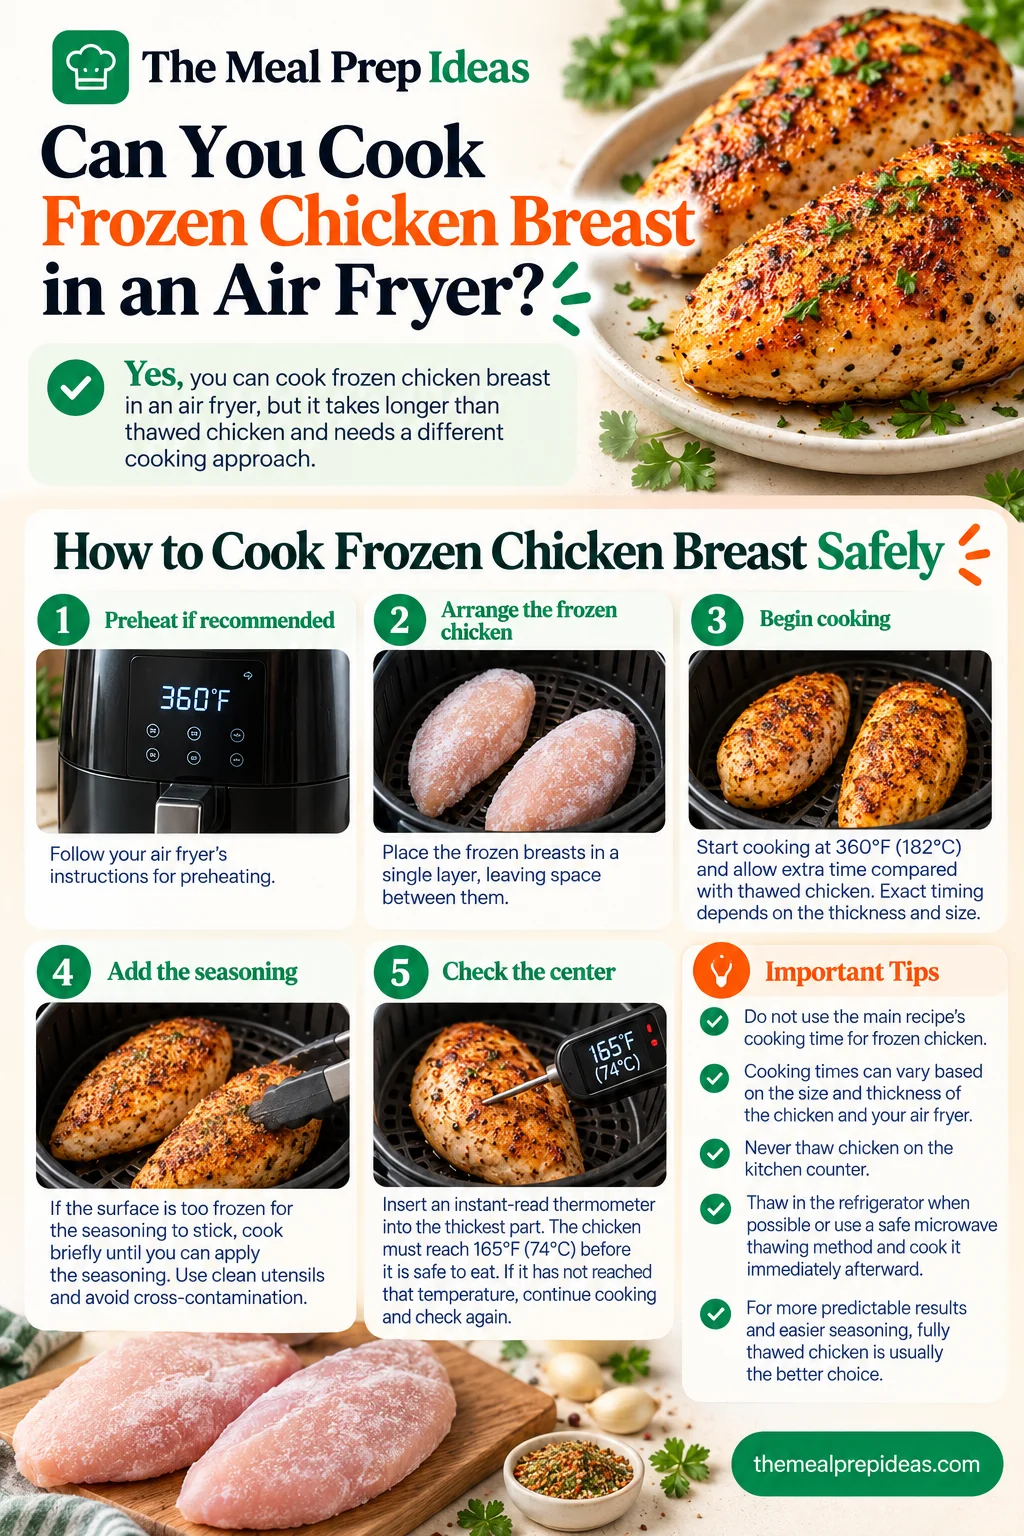
Can You Cook Frozen Chicken Breast in an Air Fryer?

Yes, you can cook frozen chicken breast in an air fryer, but it needs a different cooking approach and usually takes longer than thawed chicken. Do not use the main recipe's cooking time as a guarantee for frozen chicken.

For the best results, use separate timing guidance for frozen chicken and check the internal temperature before serving. The method below is general guidance rather than a tested frozen version of the main recipe, so cooking times can vary depending on the size of the chicken and your air fryer.

How to Cook Frozen Chicken Breast Safely

  1. 1Preheat if recommended: Follow your air fryer's instructions for preheating.
  2. 2Arrange the frozen chicken: Place the frozen breasts in a single layer in the basket, leaving space between them.
  3. 3Begin cooking: Start cooking at a moderate temperature, such as 360°F (182°C) and allow extra time compared with thawed chicken. Exact timing depends on the thickness and size of the breasts, so avoid relying on a fixed time alone.
  4. 4Add the seasoning: If the surface is still too frozen for the seasoning to stick, cook briefly until you can safely separate the pieces and apply the seasoning. Use clean utensils and avoid cross-contamination.
  5. 5Check the center: Insert an instant-read thermometer into the thickest part of each breast. The chicken must reach 165°F (74°C) before it is safe to eat. If it has not reached that temperature, continue cooking and check again.

Never thaw chicken on the kitchen counter. Thaw it in the refrigerator when possible or use a safe microwave thawing method and cook it immediately afterward. For more predictable results and easier seasoning, fully thawed chicken is usually the better choice for this recipe.

Frozen chicken breasts in an air fryer with safe cooking temperature guidance

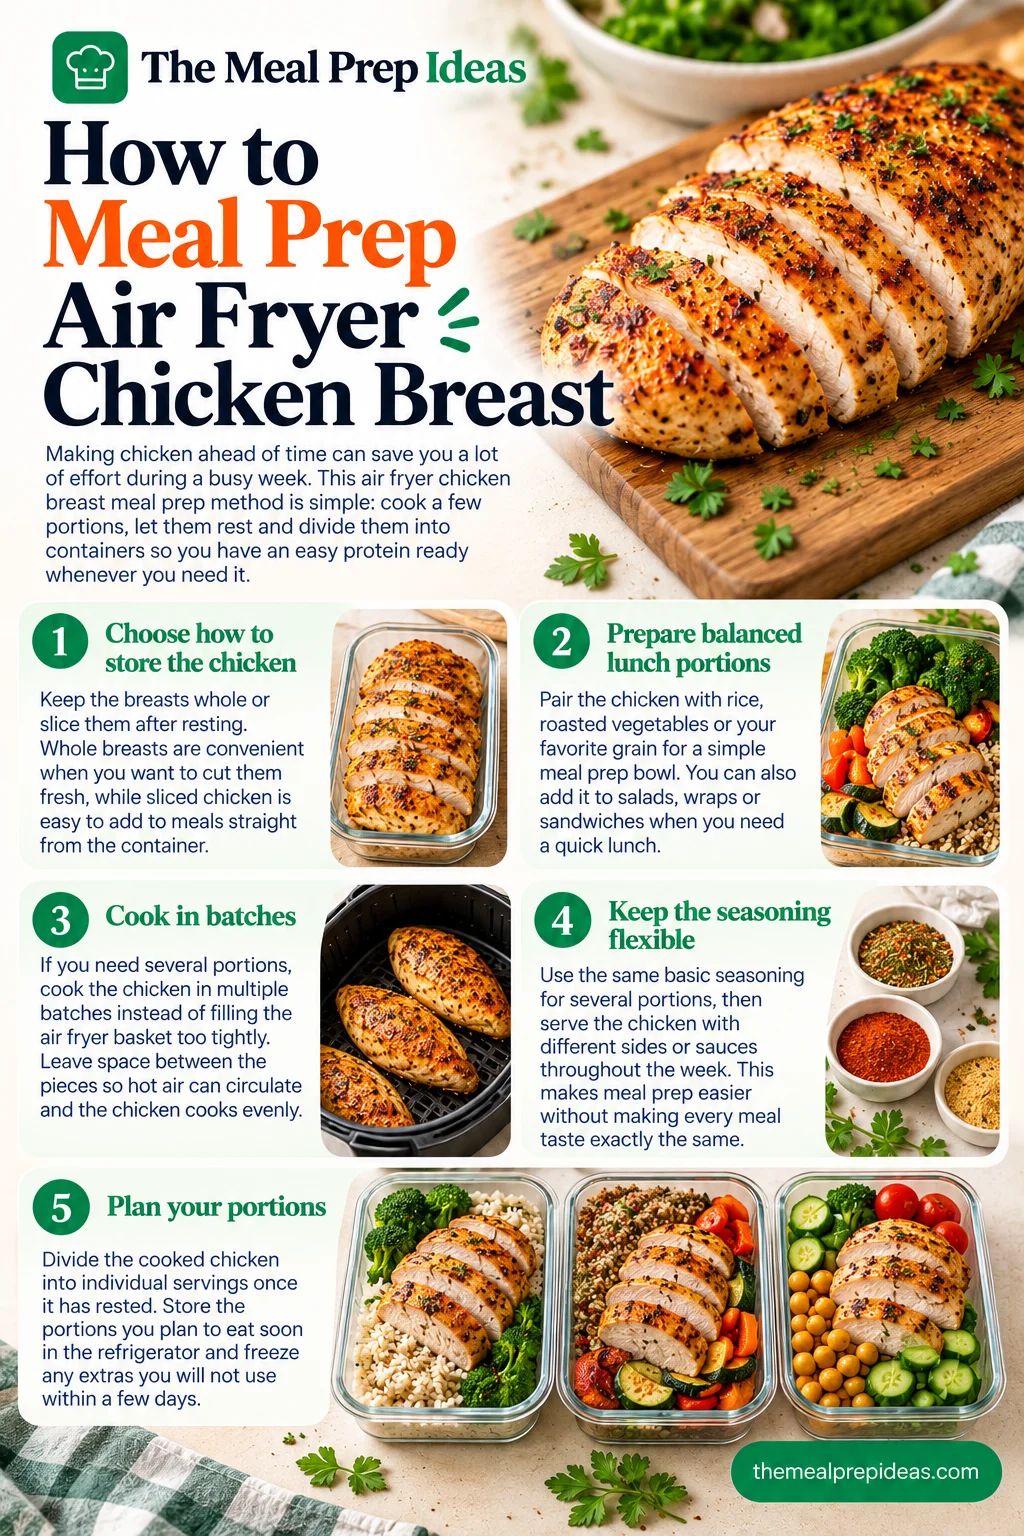
How to Meal Prep Air Fryer Chicken Breast

Making chicken ahead of time can save you a lot of effort during a busy week. This air fryer chicken breast meal prep method is simple: cook a few portions, let them rest and divide them into containers so you have an easy protein ready whenever you need it.

  • Choose how to store the chicken: You can keep the breasts whole or slice them after resting. Whole breasts are convenient when you want to cut them fresh, while sliced chicken is easy to add to meals straight from the container.
  • Prepare balanced lunch portions: Pair the chicken with rice, roasted vegetables or your favorite grain for a simple meal prep bowl. You can also add it to salads, wraps or sandwiches when you need a quick lunch.
  • Cook in batches: If you need several portions, cook the chicken in multiple batches instead of filling the air fryer basket too tightly. Leave space between the pieces so hot air can circulate and the chicken cooks evenly.
  • Keep the seasoning flexible: Use the same basic seasoning for several portions, then serve the chicken with different sides or sauces throughout the week. This makes meal prep easier without making every meal taste exactly the same.
  • Plan your portions: Divide the cooked chicken into individual servings once it has rested. Store the portions you plan to eat soon in the refrigerator and freeze any extras you will not use within a few days.

This is an easy way to keep high-protein meal prep simple. Having cooked chicken ready can make weekday lunches much easier, especially when you want something more filling than a quick snack. For another convenient make-ahead option, Sheet Pan Chicken Meal Prep combines chicken and vegetables in a practical meal prep approach for busy weekdays.

Air Fryer Chicken Breast portioned into meal prep containers with rice and vegetables

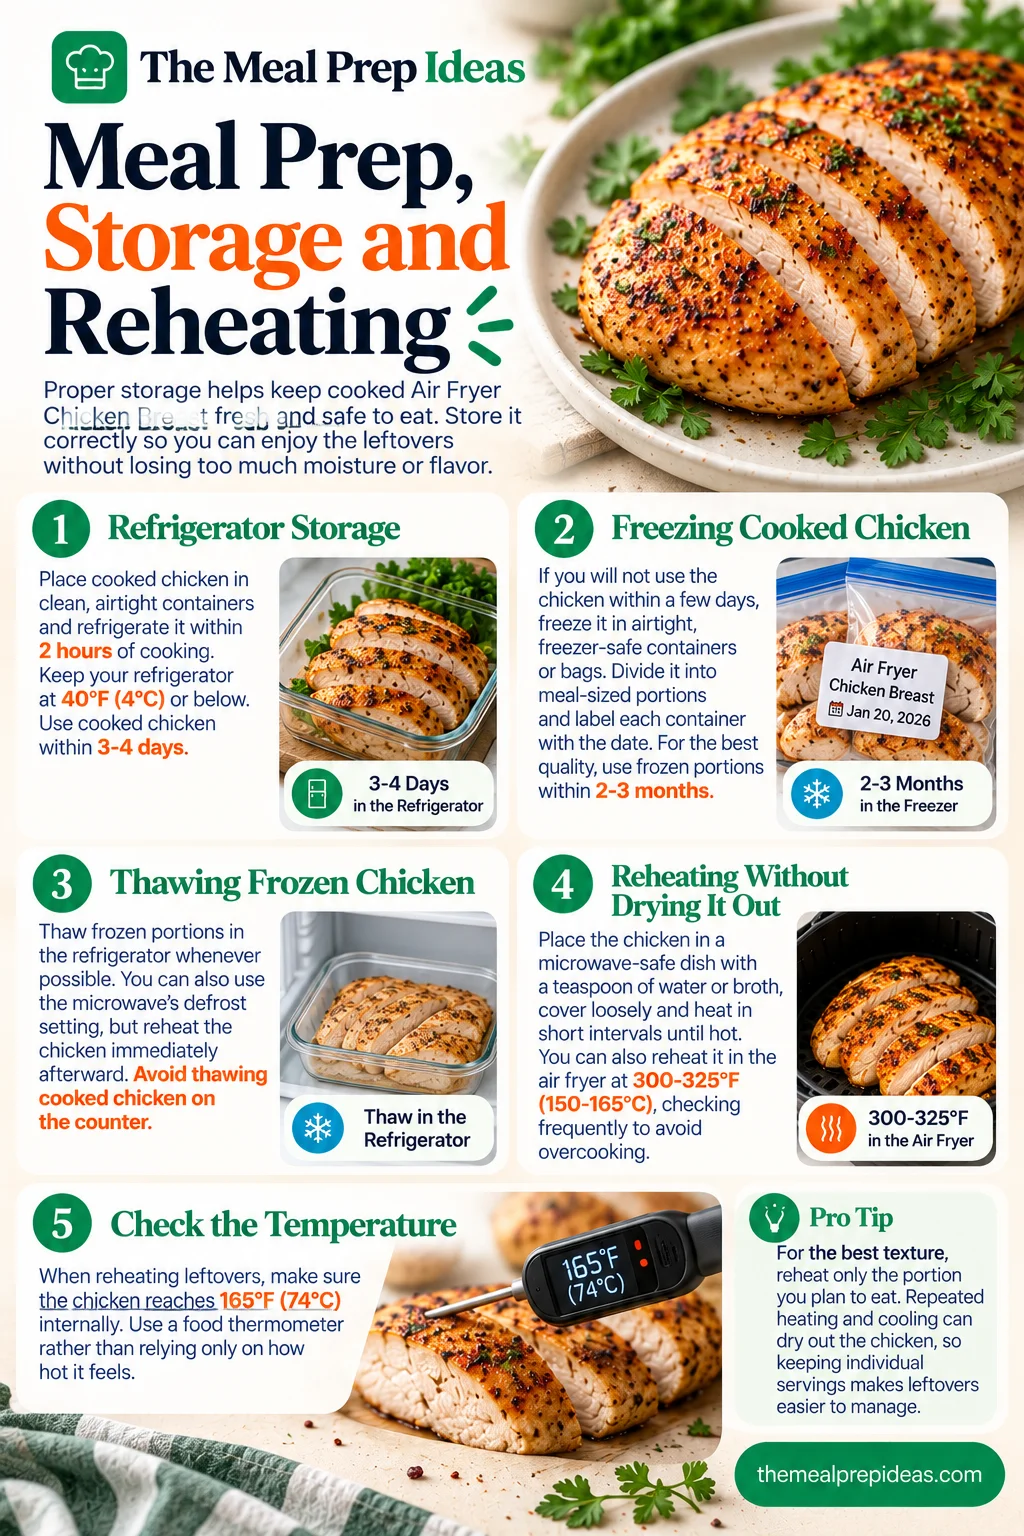
Meal Prep, Storage and Reheating

Proper storage helps keep cooked Air Fryer Chicken Breast fresh and safe to eat. Once your chicken has finished cooking, do not leave it sitting at room temperature for too long. Store it correctly so you can enjoy the leftovers without losing too much moisture or flavor.

  • Refrigerator storage: Place cooked chicken in clean, airtight containers and refrigerate it within 2 hours of cooking. Keep your refrigerator at 40°F (4°C) or below. Use cooked chicken within 3-4 days.
  • Freezing cooked chicken: If you will not use the chicken within a few days, freeze it in airtight, freezer-safe containers or bags. Divide it into meal-sized portions and label each container with the date. For the best quality, use frozen portions within about 2-3 months.
  • Thawing frozen chicken: Thaw frozen portions in the refrigerator whenever possible. You can also use the microwave's defrost setting, but reheat the chicken immediately afterward. Avoid thawing cooked chicken on the counter.
  • Reheating without drying it out: Place the chicken in a microwave-safe dish with a teaspoon of water or broth, cover loosely and heat in short intervals until hot. You can also reheat it in the air fryer at a lower temperature, around 300-325°F (150-165°C), checking frequently to avoid overcooking.
  • Check the temperature: When reheating leftovers, make sure the chicken reaches 165°F (74°C) internally. Use a food thermometer rather than relying only on how hot it feels.

For the best texture, reheat only the portion you plan to eat. Repeated heating and cooling can dry out the chicken, so keeping individual servings makes leftovers easier to manage.

Cooked chicken stored in airtight containers with refrigerator, freezer, and reheating tips

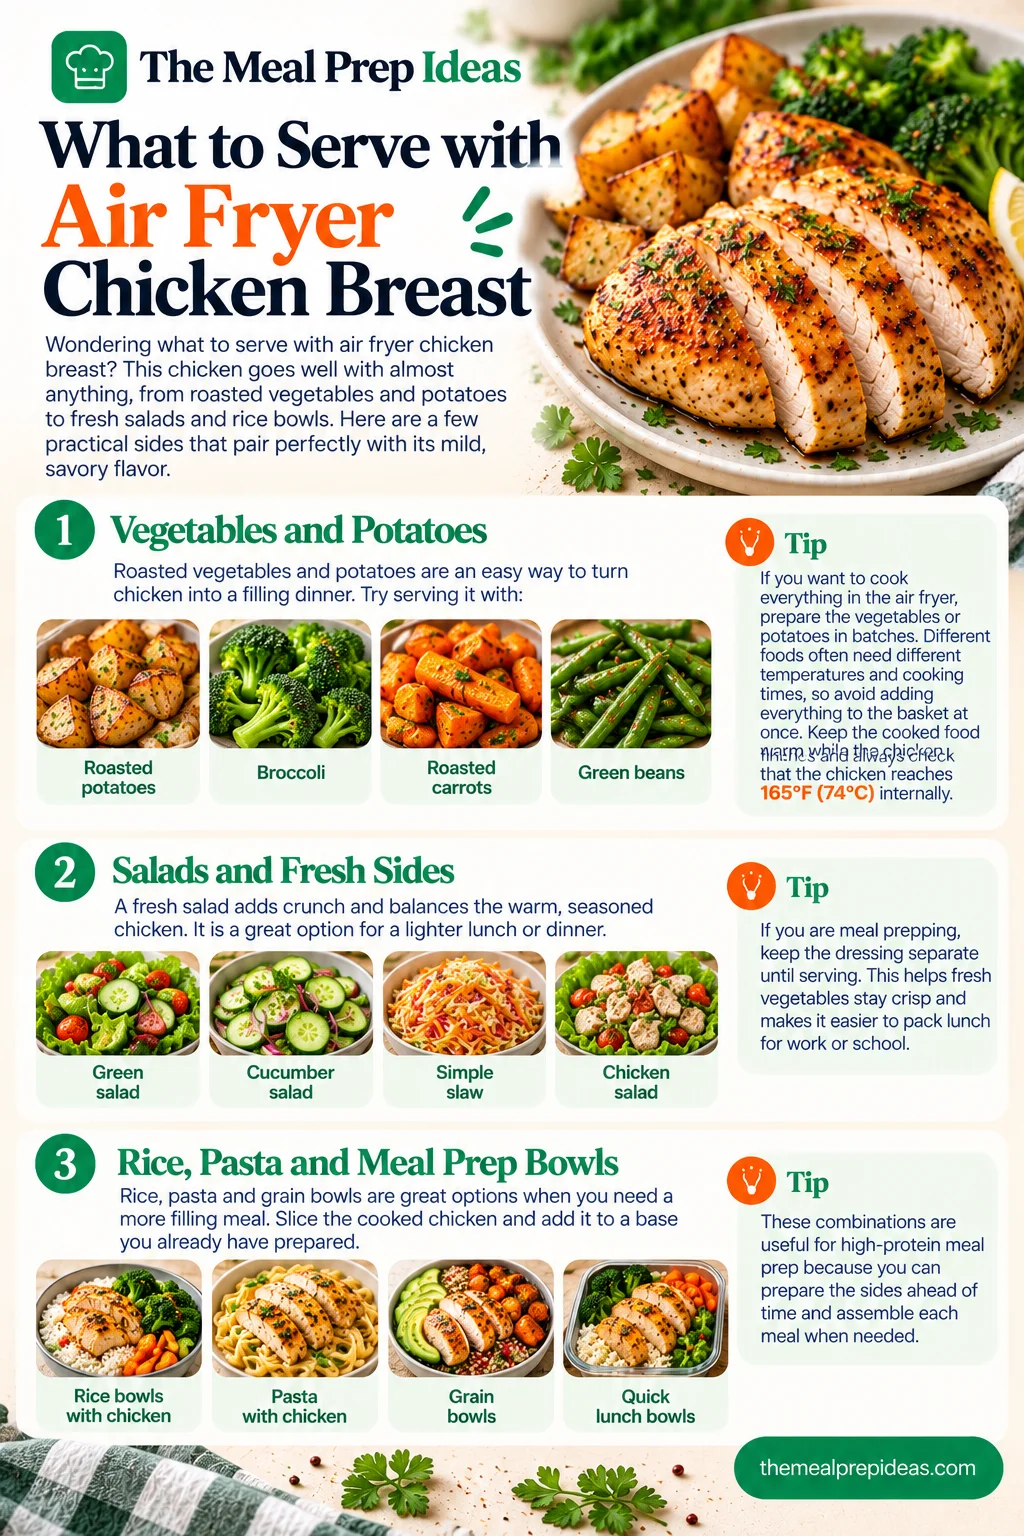
What to Serve with Air Fryer Chicken Breast

Wondering what to serve with air fryer chicken breast? The good news is that this chicken goes well with almost anything, from roasted vegetables and potatoes to fresh salads and rice bowls. You can keep dinner simple on busy nights or turn the leftovers into an easy lunch the next day.

Here are a few practical chicken dinner sides that pair well with the mild, savory seasoning of the chicken.

Vegetables and Potatoes

Roasted vegetables and potatoes are an easy way to turn chicken into a filling dinner. Try serving it with:

  • Roasted potatoes: Crispy potatoes make a satisfying side for a simple chicken dinner.
  • Broccoli: Serve steamed or roasted broccoli for a quick vegetable side.
  • Roasted carrots: Their natural sweetness works well with savory chicken.
  • Green beans: Sautéed or roasted green beans are a simple option when you want something light.

If you want to cook everything in the air fryer, prepare the vegetables or potatoes in batches if needed. Different foods often need different temperatures and cooking times, so avoid adding everything to the basket at once. Keep the cooked food warm while the chicken finishes and always check that the chicken reaches 165°F (74°C) internally.

Air Fryer Chicken Breast served with roasted potatoes, broccoli, fresh salads, and rice bowls

Salads and Fresh Sides

A fresh salad adds crunch and balances the warm, seasoned chicken. For a more complete lunch with fresh vegetables and chicken, try Mediterranean Chopped Salad With Chicken as another flavorful meal option. It is especially useful when you want a lighter lunch or dinner without spending much time cooking.

  • Green salad: Combine lettuce, cucumber, tomatoes and your favorite dressing.
  • Cucumber salad: Toss sliced cucumber with lemon juice, a little olive oil and black pepper.
  • Simple slaw: Mix shredded cabbage and carrots with a light dressing for a crunchy side.
  • Chicken salad: Slice leftover chicken and add it to greens with your favorite vegetables and dressing.

If you enjoy preparing meals ahead, keep the dressing separate until serving. This helps fresh vegetables stay crisp and makes it easier to pack lunch for work or school.

Rice, Pasta and Meal Prep Bowls

Rice, pasta and grain bowls are great options when you need a more filling meal. Slice the cooked chicken into strips or bite-sized pieces, then add it to a base you already have prepared.

  • Rice bowls with chicken: Combine sliced chicken, rice, roasted vegetables and a simple sauce.
  • Pasta with chicken: Toss the chicken with cooked pasta, vegetables and a light sauce.
  • Grain bowls: Use quinoa or another favorite grain with vegetables and a dressing you enjoy.
  • Quick lunch bowls: Add chicken to leftover rice and vegetables for an easy meal without much extra cooking.

These combinations are useful for high-protein meal prep because you can prepare the sides ahead of time and assemble each meal when needed.

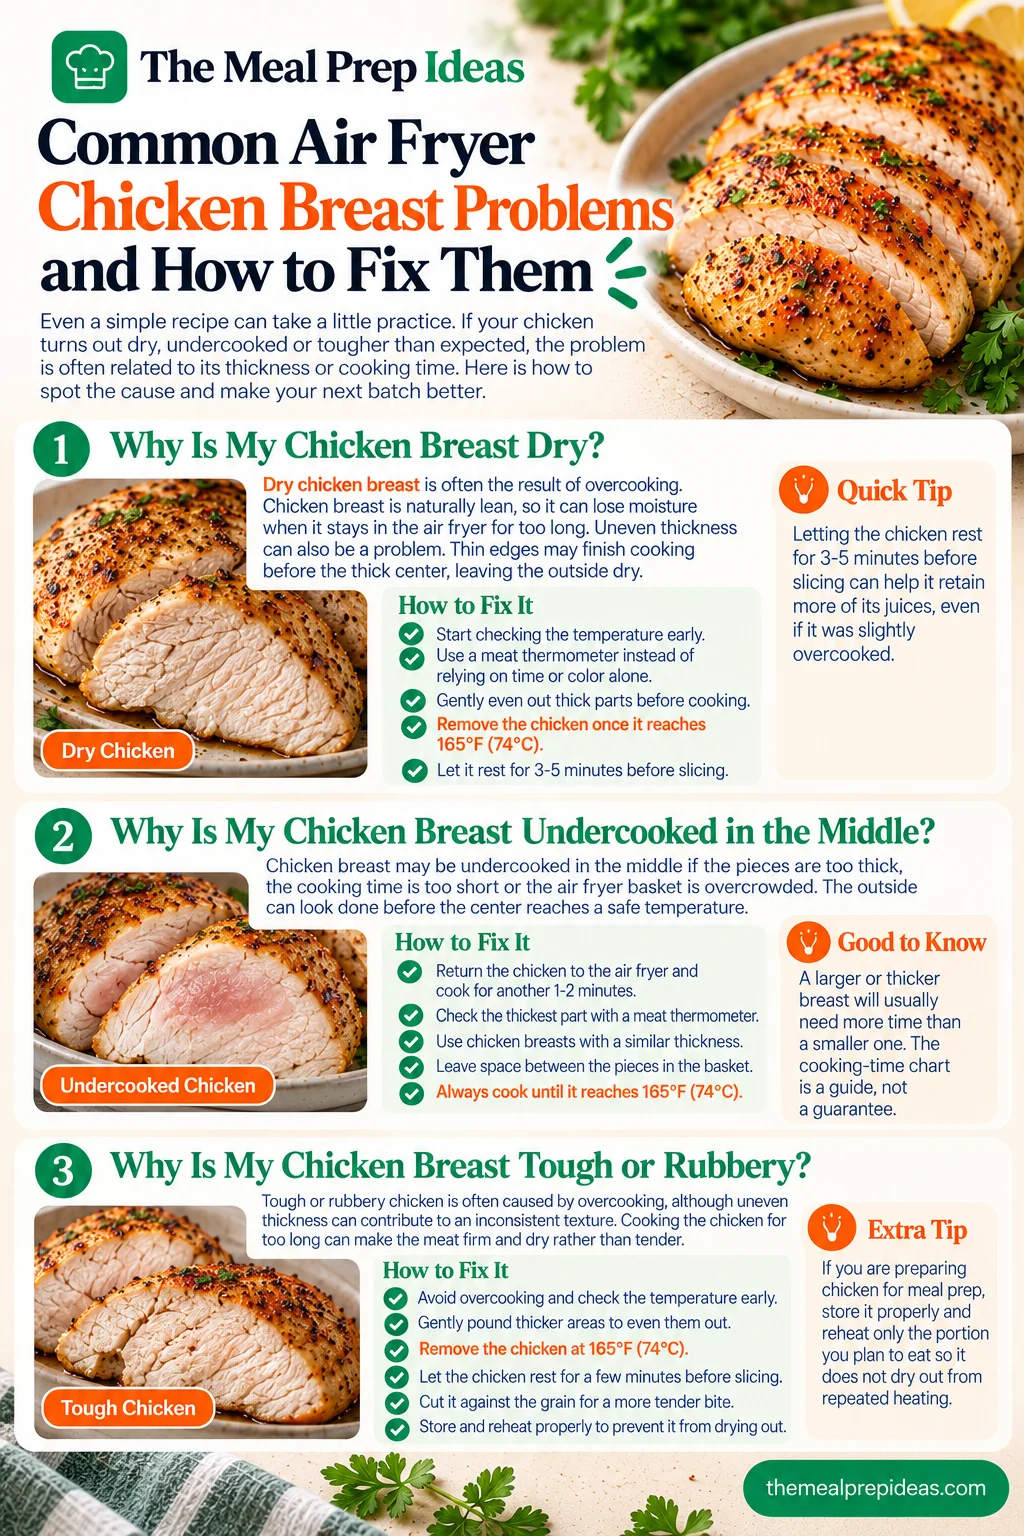
Common Air Fryer Chicken Breast Problems and How to Fix Them

Even a simple recipe can take a little practice. If your chicken turns out dry, undercooked or tougher than expected, the problem is often related to its thickness or cooking time. Here is how to spot the cause and make your next batch better.

Why Is My Chicken Breast Dry?

Dry chicken breast is often the result of overcooking. Chicken breast is naturally lean, so it can lose moisture when it stays in the air fryer for too long.

Uneven thickness can also be a problem. Thin edges may finish cooking before the thick center, leaving the outside dry while you wait for the middle to cook.

To help prevent dry chicken:

  • Start checking the temperature before the maximum estimated cooking time.
  • Use a meat thermometer instead of relying on time or color alone.
  • Gently even out very thick parts before cooking.
  • Remove the chicken once the thickest part reaches 165°F (74°C).

Let the chicken rest for 3-5 minutes before slicing. This will not reverse overcooking, but it can help the meat retain more of its juices when you cut it.

Why Is My Chicken Breast Undercooked in the Middle?

Chicken breast may be undercooked in the middle if the pieces are too thick, the cooking time is too short, or the air fryer basket is overcrowded. The outside can look done before the center reaches a safe temperature.

If your chicken is not fully cooked, return it to the air fryer and cook for another 1-2 minutes. Check the thickest part with a meat thermometer and repeat as needed until it reaches 165°F (74°C).

Next time, try to use chicken breasts with a similar thickness and leave space between the pieces. Also, remember that a larger or thicker breast will usually need more time than a smaller one. The cooking-time chart is a guide, not a guarantee.

Why Is My Chicken Breast Tough or Rubbery?

Tough or rubbery chicken is often caused by overcooking, although uneven thickness can contribute to an inconsistent texture. Cooking the chicken for too long can make the meat firm and dry rather than tender.

For better results, gently pound thicker areas to even them out, check the internal temperature early and avoid leaving the chicken in the air fryer after it has reached 165°F (74°C).

Allow the chicken to rest for a few minutes before slicing, then cut it against the grain for a more tender bite. If you are preparing chicken for meal prep, store it properly and reheat only the portion you plan to eat so it does not dry out from repeated heating.

Air Fryer Chicken Breast troubleshooting guide for dry, undercooked, and tough chicken

Frequently Asked Questions

How Long Does Chicken Breast Take in the Air Fryer?

Boneless, skinless chicken breast usually takes around 10-16 minutes at 375°F (190°C), depending on its thickness and your air fryer model. Always check the thickest part with a meat thermometer to make sure it reaches 165°F (74°C).

What Is the Best Temperature for Air Fryer Chicken Breast?

For this recipe, 375°F (190°C) is the recommended cooking temperature. The chicken must reach an internal temperature of 165°F (74°C) to be safe to eat, so check it with a meat thermometer before serving.

Do You Need to Flip Chicken Breast in an Air Fryer?

Flipping the chicken halfway through cooking helps it brown more evenly, so this recipe recommends turning it once. However, air fryer models vary and some circulate hot air more evenly than others.

Can You Cook Frozen Chicken Breast in an Air Fryer?

Yes, you can cook frozen chicken breast in an air fryer, but it takes more time than thawed chicken. Use a suitable method for frozen chicken and check the thickest part with a thermometer to confirm it reaches 165°F (74°C).

How Do You Keep Air Fryer Chicken Breast Juicy?

To keep chicken breast juicy, make the pieces a similar thickness, use a light coating of oil and avoid overcooking. Check the internal temperature early and let the chicken rest for 3-5 minutes before slicing.

How Long Does Cooked Chicken Breast Last in the Fridge?

Cooked chicken breast lasts 3-4 days in the refrigerator when stored properly. Place it in an airtight container and refrigerate it within two hours of cooking. Keep your refrigerator at 40°F (4°C) or below and reheat leftovers to 165°F (74°C).

No ratings yet

Air Fryer Chicken Breast

Make juicy Air Fryer Chicken Breast with simple seasonings in just 15–21 minutes. Perfect for easy dinners, salads, wraps and meal prep!

Golden roasted whole chicken seasoned with herbs on a wooden cutting board.the meal
prep ideas
5 minPrep
5 minTotal
Makes 2Servings
Print recipe

Ingredients

0 of 8 gathered

How to prepare

  1. 1Prepare the chicken: Pat the chicken breasts dry with paper towels. Trim any unwanted fat and gently pound thicker areas if needed to create a more even thickness.
  2. 2Add the oil and seasonings: Coat both sides of the chicken with olive oil. Mix the salt, black pepper, garlic powder, onion powder, paprika and Italian seasoning, then rub the mixture evenly over the chicken.
  3. 3Preheat the air fryer: Preheat to 375°F (190°C) for 3-5 minutes if your model recommends preheating.
  4. 4Cook the chicken: Arrange the chicken in a single layer in the air fryer basket, leaving space between the pieces. Cook at 375°F for approximately 10-16 minutes, flipping halfway through.
  5. 5Check the temperature: Insert an instant-read thermometer into the thickest part of each breast. The chicken should reach 165°F (74°C). If needed, cook for another 1-2 minutes and check again.
  6. 6Rest and serve: Transfer the chicken to a clean plate and let it rest for 3-5 minutes before slicing.

Good to know

  • Chicken size: These cooking times are a starting point for chicken breasts weighing about 6-8 ounces each. Thicker pieces may need more time, while thinner pieces may cook faster.
  • Air fryer differences: Cooking times vary by model, basket size and how much chicken you cook at once. Avoid overcrowding the basket.
  • Oil substitution: Avocado oil can be used instead of olive oil.
  • Seasoning options: Smoked paprika can replace regular paprika for a deeper flavor. Adjust the seasonings to suit your taste.
  • Food safety: Always check the internal temperature with a meat thermometer rather than relying on appearance or cooking time alone.
  • The secret to juicy chicken breast is not complicated. You do not need lots of oil or a long list of ingredients to make juicy Air Fryer Chicken Breast. A few simple steps can help you get tender, flavorful chicken without making it dry or rubbery.
  • These small habits make it easier to prepare tender chicken breast for dinner, salads, wraps and meal prep without overcomplicating the process.
  • Chicken breast thickness affects cooking time more than many beginners expect. The thin end of a breast cooks faster than the thick center, so the edges can become dry before the middle is fully cooked.
  • To help prevent this, place the chicken between two sheets of parchment paper or plastic wrap and gently pound the thicker area with a meat mallet. Aim for a more even thickness rather than making the whole breast very thin.
  • You do not need to make every piece exactly the same size, but keeping them close in thickness helps them finish cooking at a similar time. Use the cooking-time chart above as a starting point, then check each piece with a thermometer. Thicker chicken may need more time, while thinner pieces may be ready sooner.
  • Flipping chicken breast halfway through cooking is a helpful step, especially if you want evener browning on both sides. For this recipe, turn the chicken once during cooking, following the method described in the instructions.
  • However, not every air fryer works in exactly the same way. Some models circulate hot air more evenly than others and basket design can affect how the chicken browns. If your air fryer manual recommends a particular method, follow its guidance.
  • When flipping the chicken, use tongs and work carefully around the hot basket. Keep the pieces in a single layer and avoid moving them around too often. The most important thing is to check that the thickest part reaches 165°F (74°C) before serving.
  • No, brining chicken breast is optional. You can make juicy air fryer chicken without brining, as long as you prepare the chicken properly and avoid overcooking it.
  • There are two common ways to brine chicken:
  • For a quick weeknight meal, you can skip both methods. Focus on keeping the chicken at an even thickness, using the right amount of seasoning and checking the internal temperature as it cooks.
  • If you choose to brine, avoid adding too much extra salt to the seasoning afterward. This keeps the flavor balanced without making the chicken overly salty.
  • The basic seasoning gives the chicken a simple, savory flavor, but it is easy to change things up when you want something different. These seasoning and marinade variations use everyday ingredients and work well for dinner, salads, wraps and meal prep. Keep the cooking temperature the same as the main recipe and always check that the chicken reaches 165°F (74°C) internally.
  • For a fresh, savory flavor, add ½ teaspoon dried oregano and ½ teaspoon dried thyme to the original seasoning blend. You can also use Italian seasoning if you already have it in your kitchen.
  • Mix the herbs with the garlic powder, salt and black pepper, then coat the chicken lightly with oil before adding the seasoning. If you enjoy fresh herbs, sprinkle a little chopped parsley over the cooked chicken just before serving.
  • This garlic herb chicken pairs well with roasted potatoes, green beans, steamed vegetables or a simple garden salad. It is also a good choice for meal prep because the mild herb flavor works with many different meals.
  • If you like a little heat, replace the regular paprika with smoked paprika and add ¼ teaspoon chili powder to the seasoning blend. For a hotter flavor, add a small pinch of cayenne pepper.
  • Start with a little chili rather than adding too much at once. You can always increase the heat the next time you make it. Smoked paprika gives the chicken a deeper flavor, while cayenne adds a stronger kick.
  • Serve this spicy chicken with rice, roasted vegetables or a cool yogurt-based sauce. It also works well sliced into wraps or added to a meal prep bowl.
  • For a bright, zesty flavor, replace the Italian seasoning with lemon pepper seasoning. Add a little finely grated lemon zest if you want a stronger lemon taste.
  • Mix the seasoning with the other dry ingredients, then coat the chicken with a light layer of oil so everything sticks. Avoid adding too much lemon juice before cooking, as excess liquid can make the seasoning slide off the chicken.
  • Once the chicken is cooked, squeeze a little fresh lemon juice over the top if desired. Lemon pepper chicken tastes great with roasted broccoli, rice, potatoes or a fresh salad.
  • A quick chicken breast marinade is another way to add flavor before cooking. In a small bowl, mix the following ingredients:
  • Add the chicken and coat it evenly with the marinade. Cover and refrigerate for 30 minutes to 2 hours for added flavor. This marinating time is separate from the cooking time. Before air frying, let excess marinade drip off so the chicken is not too wet.
  • Always marinate raw chicken in the refrigerator, never on the counter. Discard leftover marinade that has touched raw chicken, unless you boil it thoroughly before using it as a sauce. Cook the chicken using the main recipe's method and check the thickest part with a thermometer.
  • Yes, you can cook frozen chicken breast in an air fryer, but it needs a different cooking approach and usually takes longer than thawed chicken. Do not use the main recipe's cooking time as a guarantee for frozen chicken.
  • For the best results, use separate timing guidance for frozen chicken and check the internal temperature before serving. The method below is general guidance rather than a tested frozen version of the main recipe, so cooking times can vary depending on the size of the chicken and your air fryer.
  • Never thaw chicken on the kitchen counter. Thaw it in the refrigerator when possible or use a safe microwave thawing method and cook it immediately afterward. For more predictable results and easier seasoning, fully thawed chicken is usually the better choice for this recipe.
  • Making chicken ahead of time can save you a lot of effort during a busy week. This air fryer chicken breast meal prep method is simple: cook a few portions, let them rest and divide them into containers so you have an easy protein ready whenever you need it.
  • This is an easy way to keep high-protein meal prep simple. Having cooked chicken ready can make weekday lunches much easier, especially when you want something more filling than a quick snack. For another convenient make-ahead option, Sheet Pan Chicken Meal Prep combines chicken and vegetables in a practical meal prep approach for busy weekdays.
  • Proper storage helps keep cooked Air Fryer Chicken Breast fresh and safe to eat. Once your chicken has finished cooking, do not leave it sitting at room temperature for too long. Store it correctly so you can enjoy the leftovers without losing too much moisture or flavor.
  • For the best texture, reheat only the portion you plan to eat. Repeated heating and cooling can dry out the chicken, so keeping individual servings makes leftovers easier to manage.
  • Wondering what to serve with air fryer chicken breast? The good news is that this chicken goes well with almost anything, from roasted vegetables and potatoes to fresh salads and rice bowls. You can keep dinner simple on busy nights or turn the leftovers into an easy lunch the next day.
  • Here are a few practical chicken dinner sides that pair well with the mild, savory seasoning of the chicken.
  • Roasted vegetables and potatoes are an easy way to turn chicken into a filling dinner. Try serving it with:
  • If you want to cook everything in the air fryer, prepare the vegetables or potatoes in batches if needed. Different foods often need different temperatures and cooking times, so avoid adding everything to the basket at once. Keep the cooked food warm while the chicken finishes and always check that the chicken reaches 165°F (74°C) internally.
  • A fresh salad adds crunch and balances the warm, seasoned chicken. For a more complete lunch with fresh vegetables and chicken, try Mediterranean Chopped Salad With Chicken as another flavorful meal option. It is especially useful when you want a lighter lunch or dinner without spending much time cooking.
  • If you enjoy preparing meals ahead, keep the dressing separate until serving. This helps fresh vegetables stay crisp and makes it easier to pack lunch for work or school.
  • Rice, pasta and grain bowls are great options when you need a more filling meal. Slice the cooked chicken into strips or bite-sized pieces, then add it to a base you already have prepared.
  • These combinations are useful for high-protein meal prep because you can prepare the sides ahead of time and assemble each meal when needed.
  • Even a simple recipe can take a little practice. If your chicken turns out dry, undercooked or tougher than expected, the problem is often related to its thickness or cooking time. Here is how to spot the cause and make your next batch better.
  • Dry chicken breast is often the result of overcooking. Chicken breast is naturally lean, so it can lose moisture when it stays in the air fryer for too long.
  • Uneven thickness can also be a problem. Thin edges may finish cooking before the thick center, leaving the outside dry while you wait for the middle to cook.
  • To help prevent dry chicken:
  • Let the chicken rest for 3-5 minutes before slicing. This will not reverse overcooking, but it can help the meat retain more of its juices when you cut it.
  • Chicken breast may be undercooked in the middle if the pieces are too thick, the cooking time is too short, or the air fryer basket is overcrowded. The outside can look done before the center reaches a safe temperature.
  • If your chicken is not fully cooked, return it to the air fryer and cook for another 1-2 minutes. Check the thickest part with a meat thermometer and repeat as needed until it reaches 165°F (74°C).
  • Next time, try to use chicken breasts with a similar thickness and leave space between the pieces. Also, remember that a larger or thicker breast will usually need more time than a smaller one. The cooking-time chart is a guide, not a guarantee.
  • Tough or rubbery chicken is often caused by overcooking, although uneven thickness can contribute to an inconsistent texture. Cooking the chicken for too long can make the meat firm and dry rather than tender.
  • For better results, gently pound thicker areas to even them out, check the internal temperature early and avoid leaving the chicken in the air fryer after it has reached 165°F (74°C).
  • Allow the chicken to rest for a few minutes before slicing, then cut it against the grain for a more tender bite. If you are preparing chicken for meal prep, store it properly and reheat only the portion you plan to eat so it does not dry out from repeated heating.
High-ProteinGluten-FreeDairy-FreeLow-Carb

Made this recipe?

Tag @themealprepideas on Instagram — we love seeing what you made.

Tag us

Reviews & Comments

Be the first to rate, review, or ask a question about this recipe.

No comments yet

Be the first cook to share feedback or ask a question about this recipe!

Leave a Review & Rating

Tap to rate

Comments are moderated for community safety. External links are filtered.

Keep Cooking

You Might Also Like

Chicken and Chickpea Curry

Chicken and Chickpea Curry

Make this easy Chicken and Chickpea Curry with tender chicken, hearty chickpeas and a rich, flavorful sauce. Perfect for a quick weeknight dinner.

15 min
Get Recipe

Crockpot Pot Roast

Crockpot Pot Roast

Make this Crockpot Pot Roast with tender beef, hearty vegetables, and rich, savory gravy. An easy slow cooker dinner perfect for busy weeknights!

20 min
Get Recipe

Sheet Pan Chicken Pitas With Tzatziki

Sheet Pan Chicken Pitas With Tzatziki

Easy Sheet Pan Chicken Pitas with Tzatziki! Tender lemon garlic chicken & roasted veggies wrapped in warm pita with creamy tzatziki. Great for meal prep!

15 min
Get Recipe

Get Your Free 7-Day Meal Prep Plan

Join 50,000+ subscribers getting weekly meal prep ideas, shopping lists, and time-saving tips straight to their inbox.

No spam. Unsubscribe anytime.