Meal Prep Ideas
Back to Home Page

No-Bake Trail Mix Bars

Make easy No-Bake Trail Mix Bars with oats, nuts, seeds, dried fruit, peanut butter, and honey. A chewy, crunchy snack for meal prep.

No-Bake Trail Mix Bars made with oats, almonds, dried cranberries, and other wholesome ingredients.

Get This Recipe Summarized by AI

Ask your favorite AI assistant to summarize this recipe, suggest swaps, or scale it up — one click away.

We copy the prompt to your clipboard too — just paste (Ctrl/Cmd+V) if it doesn't appear automatically.

No-Bake Trail Mix Bars are chewy, wholesome snack bars made with rolled oats, nuts, seeds, dried fruit, peanut butter, and honey. They come together without an oven and are easy to prepare for breakfast, school snacks, afternoon cravings, or meal prep.

The combination of oats, nuts, seeds, and dried fruit gives these No-Bake Trail Mix Bars a satisfying texture, while peanut butter and honey help bind everything together. You can easily customize the ingredients based on what you have in your pantry.

Why You’ll Love These No-Bake Trail Mix Bars

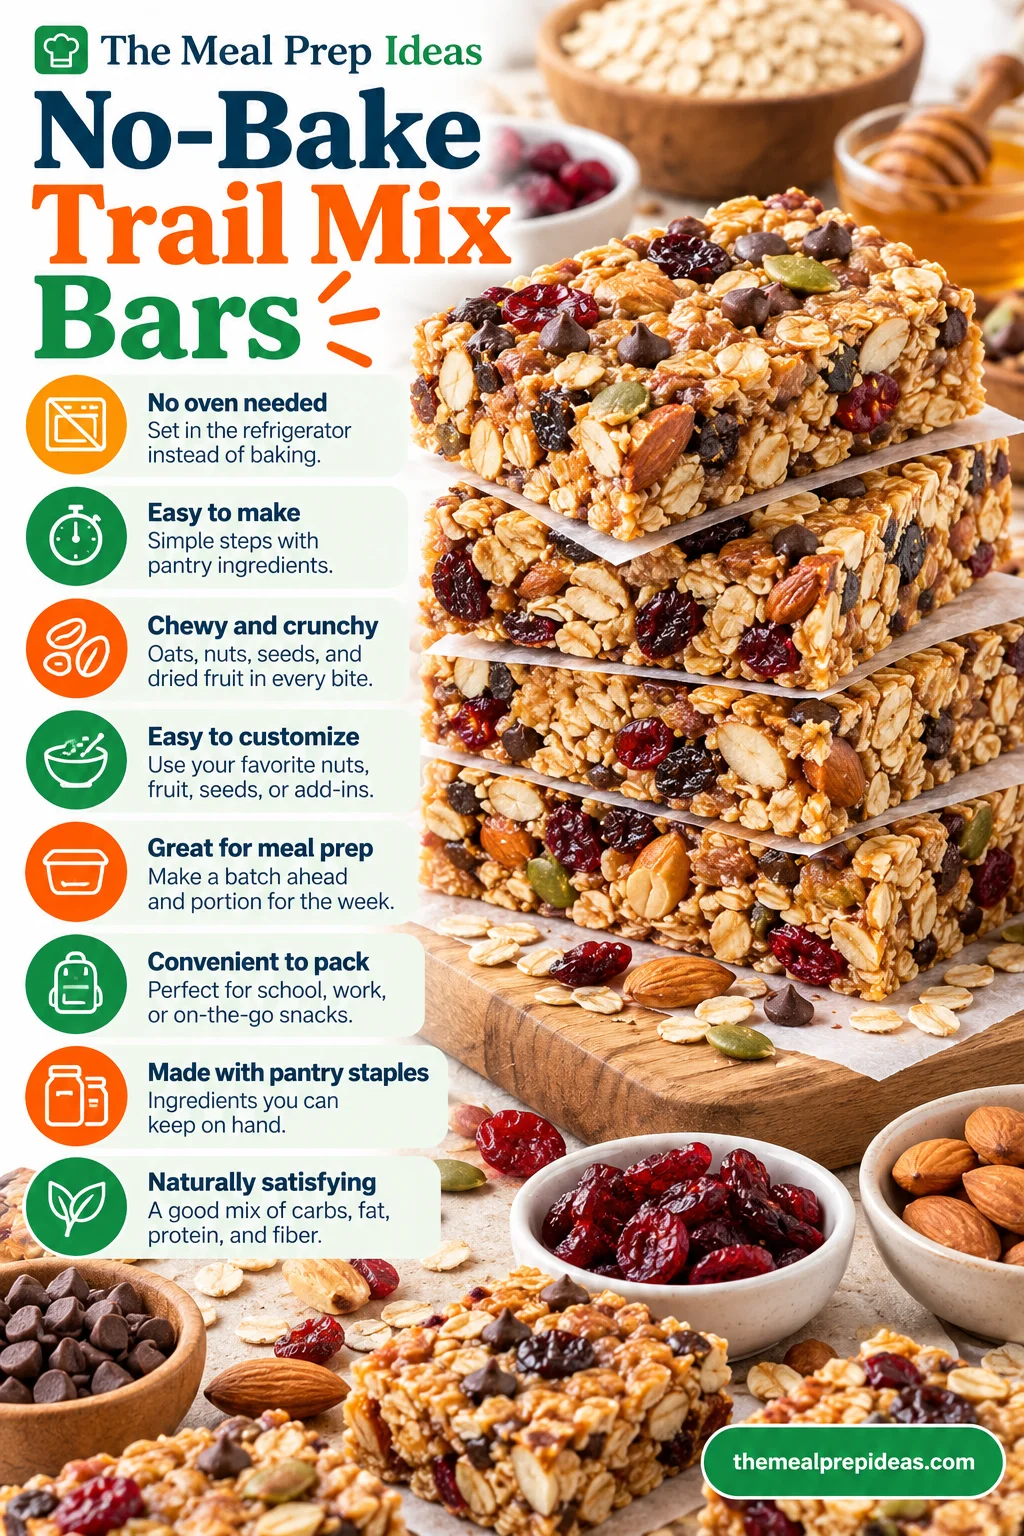
  • No oven needed: These No-Bake Trail Mix Bars set in the refrigerator instead of requiring baking.
  • Easy to make: The ingredients come together in a few simple steps.
  • Chewy and crunchy: Soft oats and peanut butter pair with nuts, seeds, and dried fruit.
  • Easy to customize: Swap the nuts, fruit, seeds, or flavor additions to create your favorite combination.
  • Great for meal prep: Make a batch ahead and portion it into individual snacks.
  • Convenient to pack: Once chilled and sliced, the bars are easy to take along for a busy day.
  • Made with pantry staples: Most ingredients can be kept on hand for quick snack preparation.
  • Naturally satisfying: Oats, nuts, seeds, and nut butter provide a combination of carbohydrates, fat, protein, and fiber.

If you enjoy easy, make-ahead snacks with oats and peanut butter, try our Peanut Butter Granola Bars for another homemade option.

A chewy oat bar packed with almonds and dried cranberries on a clean white background.

No-Bake Trail Mix Bars Recipe

Time

  • Prep Time: 15 minutes
  • Chill Time: 1 hour
  • Total Time: 1 hour 15 minutes
  • Servings: 12 bars

Ingredients

  • 2 cups old-fashioned rolled oats
  • ½ cup creamy peanut butter
  • ⅓ cup honey
  • ¼ cup unsweetened shredded coconut
  • ½ cup roasted almonds, roughly chopped
  • ¼ cup pumpkin seeds
  • ¼ cup sunflower seeds
  • ½ cup dried cranberries
  • ¼ cup raisins
  • 1 teaspoon vanilla extract
  • ½ teaspoon ground cinnamon
  • ¼ teaspoon salt
  • ⅓ cup mini chocolate chips, optional

Instructions

  1. 1Prepare the pan: Line an 8-inch square baking pan with parchment paper, leaving some parchment hanging over two sides for easy removal later.
  2. 2Prepare the dry ingredients: Add the rolled oats, shredded coconut, chopped almonds, pumpkin seeds, sunflower seeds, dried cranberries, and raisins to a large bowl. Stir until evenly combined.
  3. 3Make the binding mixture: Add the peanut butter and honey to a small saucepan. Warm over low heat, stirring continuously, until the mixture becomes smooth and easy to stir. Do not bring it to a boil. Remove from the heat and stir in the vanilla, cinnamon, and salt.
  4. 4Combine everything: Pour the warm peanut butter mixture over the dry ingredients. Stir thoroughly until the oats, nuts, seeds, and fruit are evenly coated.
  5. 5Add chocolate chips: Let the mixture cool for a few minutes, then fold in the mini chocolate chips if using. Adding them while the mixture is slightly cooler helps prevent them from melting completely.
  6. 6Press into the pan: Transfer the mixture to the prepared pan. Use the back of a spoon, spatula, or another piece of parchment paper to press it down firmly and evenly. Pay extra attention to the corners and edges.
  7. 7Chill: Cover the pan and refrigerate for at least 1 hour, or until the mixture is firm enough to slice.
  8. 8Slice and serve: Lift the chilled mixture from the pan using the parchment paper. Place it on a cutting board and cut into 12 bars or smaller squares.

Notes

  • Press firmly: Compacting the mixture is one of the most important steps for keeping the bars together.
  • Use thick peanut butter: A thick, creamy peanut butter provides better binding than a very runny variety.
  • Do not overheat the binding mixture: Gentle warming is enough to loosen the peanut butter and honey.
  • Let the mixture cool slightly: If adding chocolate chips, allow the mixture to cool first so they do not melt into the entire batch.
  • Customize the mix: Keep the overall amount of dry ingredients close to the recipe so the bars have enough binding mixture to hold together.
  • Use parchment paper: It makes removing the chilled mixture much easier.
  • Adjust the texture: If the mixture feels too dry before pressing, add a little more peanut butter. If it feels excessively wet, mix in a small amount of oats.
  • Nutrition estimate: Values are approximate per bar and are based on 12 servings, including the optional chocolate chips.

Nutrition

Estimated nutrition per bar, based on 12 bars:

  • Calories: 250
  • Protein: 6 g
  • Carbohydrates: 31 g
  • Fat: 12 g
  • Saturated Fat: 3 g
  • Fiber: 4 g
  • Sugar: 16 g
  • Sodium: 100 mg

These values are estimates and can vary depending on the brands and quantities of peanut butter, dried fruit, nuts, seeds, and chocolate chips used.

Dietary

  • Vegetarian: Yes.
  • Vegan: Not as written because the recipe uses honey. Replace honey with a suitable plant-based syrup for a vegan version.
  • Dairy-Free: Yes, when using dairy-free chocolate chips or leaving them out.
  • Gluten-Free: Oats are naturally gluten-free, but use certified gluten-free oats if necessary.
  • Nut-Free: Not as written because it contains peanut butter and almonds. Use sunflower seed butter and additional seeds instead for a nut-free version, checking labels for potential cross-contact.
  • High-Fiber: Oats, seeds, nuts, coconut, and dried fruit provide dietary fiber.

How to Make No-Bake Trail Mix Bars

Prepare the Trail Mix Ingredients

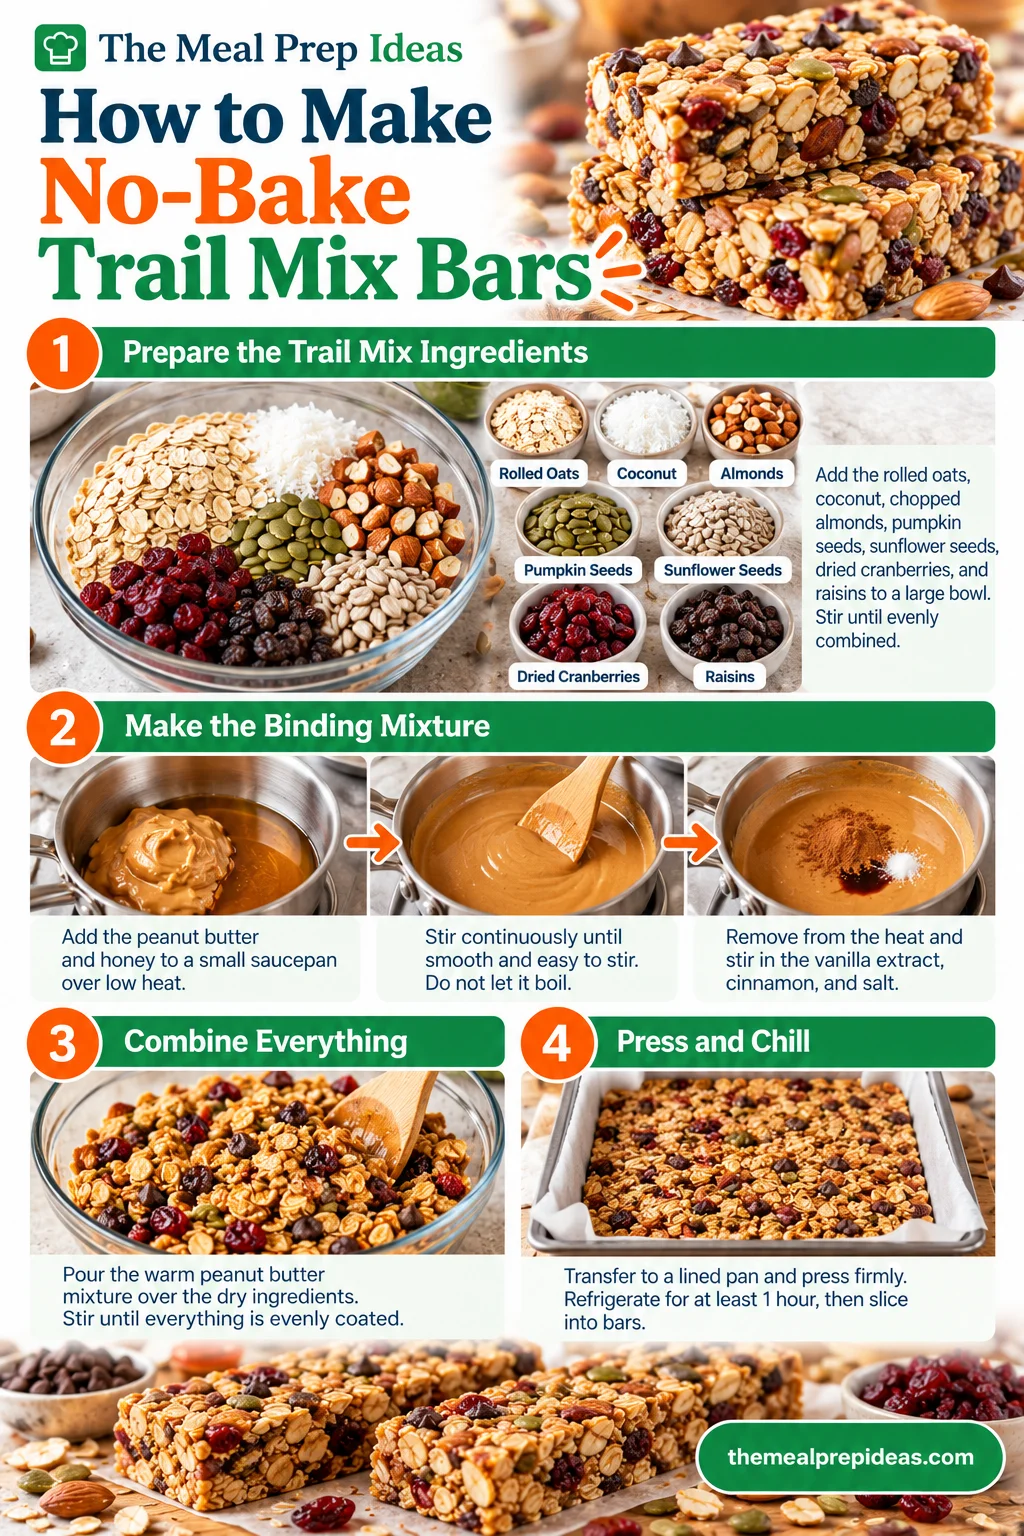
Start by measuring all the dry ingredients before making the binding mixture. Add the rolled oats, coconut, chopped almonds, pumpkin seeds, sunflower seeds, dried cranberries, and raisins to a large bowl.

Give everything a good stir so the nuts, seeds, and dried fruit are distributed evenly. This helps ensure that every bar contains a balanced mixture rather than having most of the fruit or nuts concentrated in one area.

If your almonds are whole or large, chop them into smaller pieces. Smaller pieces make the bars easier to slice and eat while still providing some crunch.

Make the Binding Mixture

Add the peanut butter and honey to a small saucepan over low heat. Stir continuously until the peanut butter loosens and combines smoothly with the honey.

You only need gentle heat. The mixture should be warm and easy to stir, not bubbling or boiling. Excessive heat can change the texture and make the mixture harder to work with.

Remove the saucepan from the heat and stir in the vanilla extract, cinnamon, and salt. These ingredients add flavor while the warm peanut butter mixture provides the main binding structure.

No-Bake Trail Mix Bars pressed into a square pan and chilled until firm before slicing.

Combine Everything

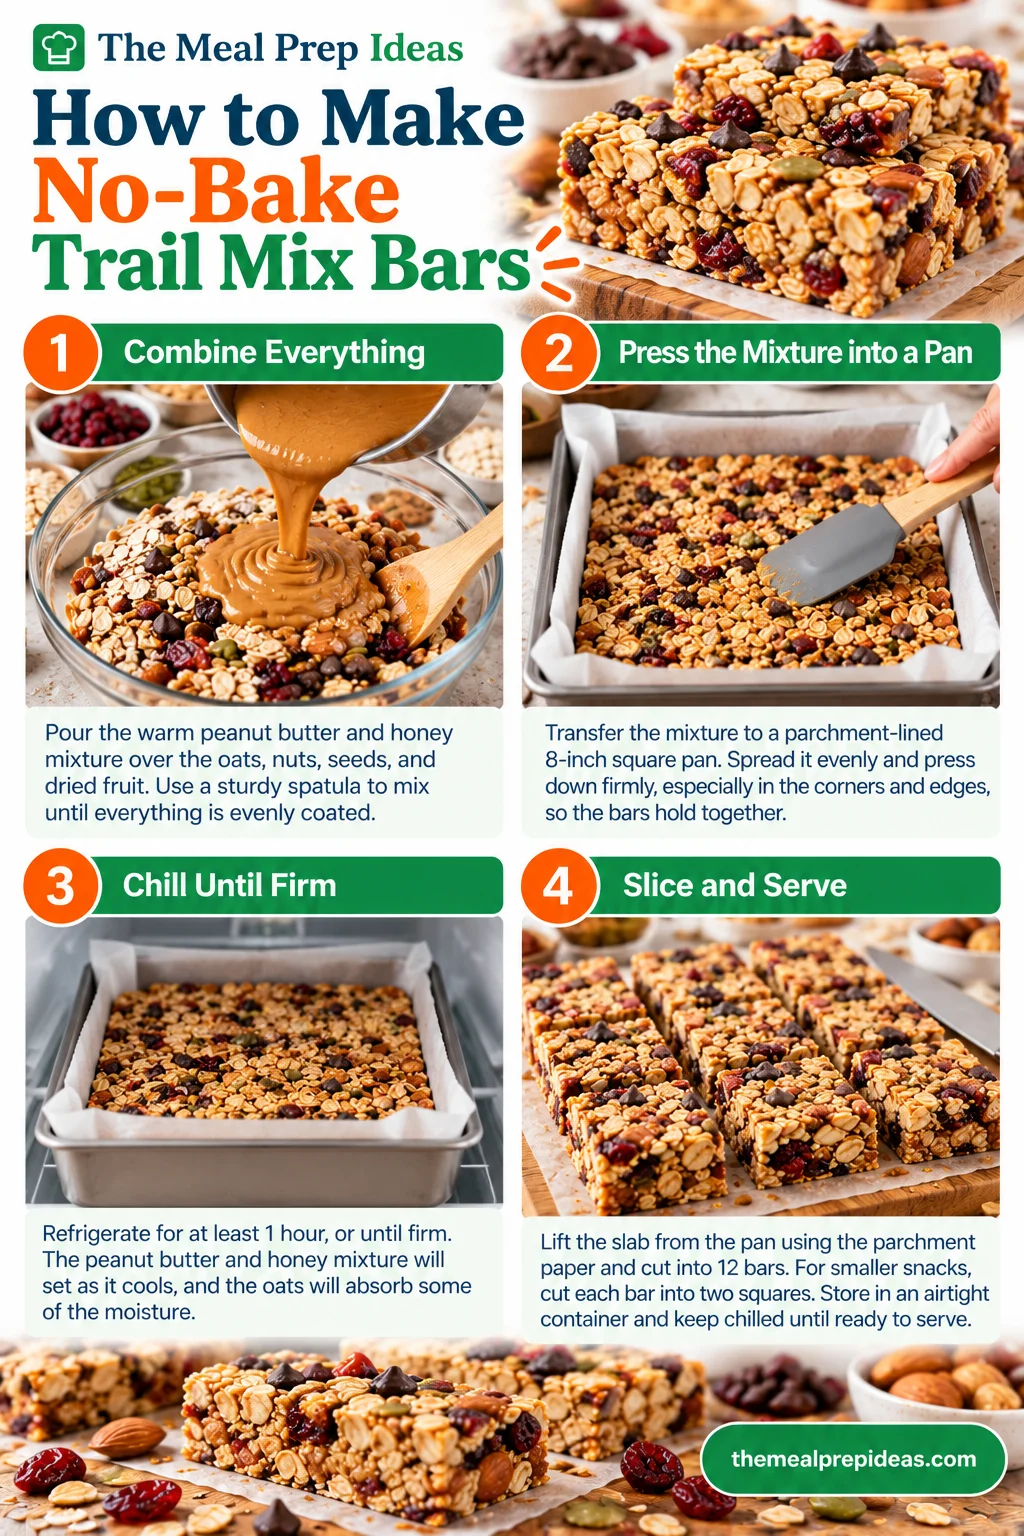
Pour the warm binding mixture over the prepared oats, nuts, seeds, and dried fruit. Use a sturdy spatula or large spoon to mix everything thoroughly.

Keep stirring until there are no obvious dry patches and the peanut butter mixture coats the ingredients evenly. Scrape around the bottom and sides of the bowl so the binding mixture is fully incorporated.

If you are adding chocolate chips, allow the mixture to cool for a few minutes first. Then fold them in gently.

Press the Mixture into a Pan

Transfer the mixture to the parchment-lined 8-inch square pan. Spread it into an even layer using a spatula.

Press down firmly across the entire surface. You can place another sheet of parchment paper over the mixture and press with your hands or the flat bottom of a measuring cup.

Pay particular attention to the corners and edges. Proper compression helps the ingredients stick together and prevents the finished bars from crumbling.

Chill Until Firm

Place the pan of No-Bake Trail Mix Bars in the refrigerator and chill for at least 1 hour. The peanut butter and honey mixture will firm up as it cools, while the oats absorb some of the moisture.

For cleaner slices, make sure the entire slab is firm before cutting. If it still feels soft after an hour, refrigerate it for another 20–30 minutes.

Slice and Serve

Once the mixture is firm, lift the slab from the pan using the parchment paper. Transfer it to a cutting board and use a sharp knife to cut it into 12 bars.

For smaller snacks, cut each bar into two squares. Store the finished pieces in an airtight container and keep them chilled until ready to serve.

No-Bake Trail Mix Bars pressed into a square pan and chilled until firm before slicing.

No-Bake Trail Mix Bar Variations

Nut Options

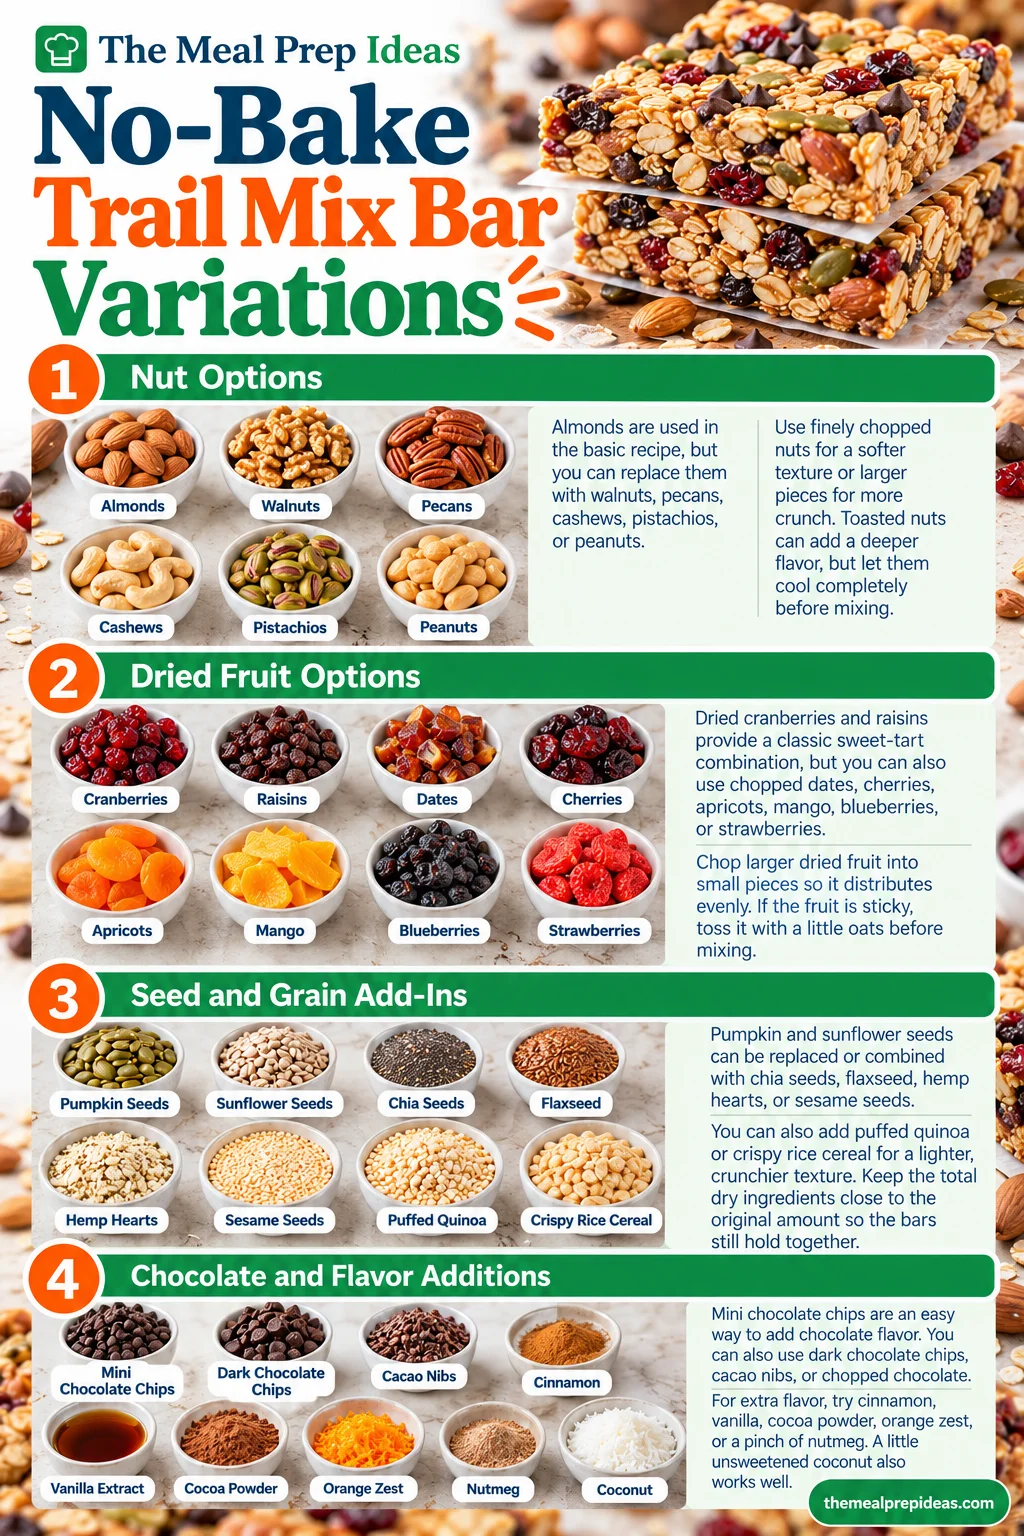
Almonds are used in the basic recipe, but you can replace them with chopped walnuts, pecans, cashews, pistachios, or peanuts.

For a softer texture, use finely chopped nuts. For more crunch, leave some pieces slightly larger. Toasted nuts can add a deeper flavor, but allow them to cool completely before mixing them into the recipe.

Dried Fruit Options

Dried cranberries and raisins provide a classic sweet-tart combination, but many other dried fruits work well.

Try chopped dates, dried cherries, apricots, mango, blueberries, or strawberries. Larger dried fruit should be chopped into small pieces so it distributes evenly throughout the bars.

If the dried fruit is especially sticky, toss the chopped pieces with a small amount of oats before mixing to help separate them.

Seed and Grain Add-Ins

Pumpkin and sunflower seeds can be replaced or combined with chia seeds, flaxseed, hemp hearts, or sesame seeds.

You can also add a small amount of puffed quinoa or crispy rice cereal for a lighter, crunchier texture. Keep the total dry ingredients reasonably close to the original amount so the bars still have enough binding mixture.

Chocolate and Flavor Additions

Mini chocolate chips are an easy way to add a little chocolate flavor. Dark chocolate chips, cacao nibs, or finely chopped dark chocolate can also work.

For additional flavor, try cinnamon, vanilla, cocoa powder, orange zest, or a small pinch of nutmeg. A little unsweetened coconut can also complement the nuts and dried fruit. For another bite-sized snack made with oats and peanut butter, try our Peanut Butter Oatmeal Balls, which are easy to prepare ahead.

No-Bake Trail Mix Bars with different nuts, dried fruits, seeds, coconut, and chocolate chips.

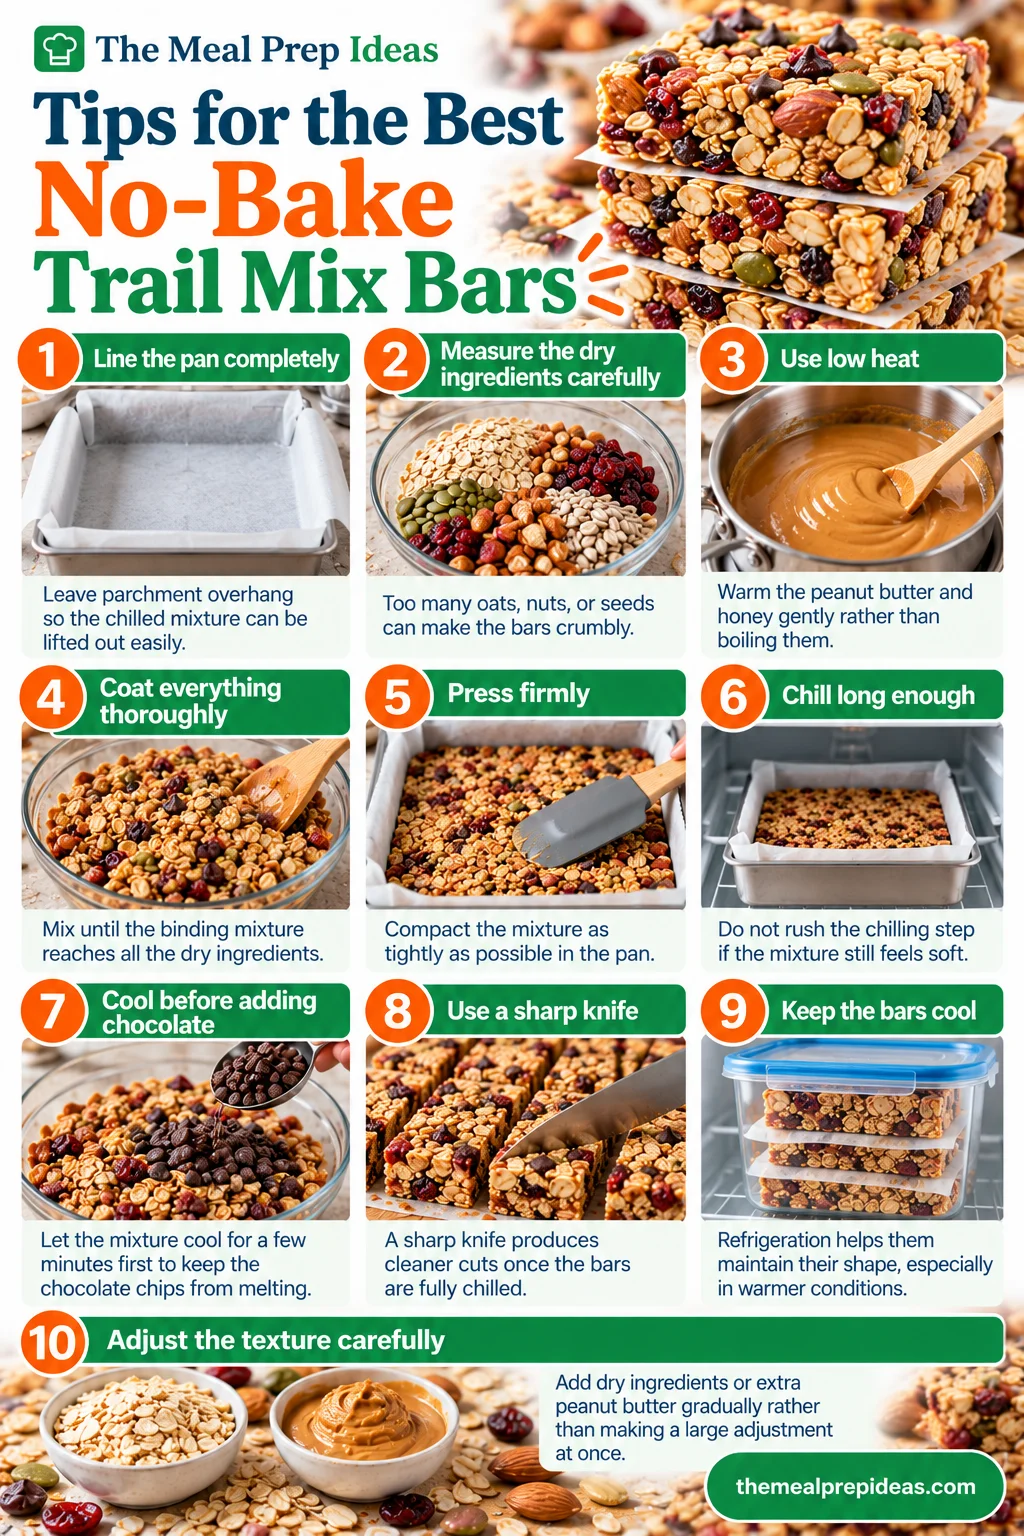
Tips for the Best No-Bake Trail Mix Bars

  • Line the pan completely: Leave parchment overhang so the chilled mixture can be lifted out easily.
  • Measure the dry ingredients carefully: Too many oats, nuts, or seeds can make the bars crumbly.
  • Use low heat: Warm the peanut butter and honey gently rather than boiling them.
  • Coat everything thoroughly: Mix until the binding mixture reaches all the dry ingredients.
  • Press firmly: Compact the mixture as tightly as possible in the pan.
  • Chill long enough: Do not rush the chilling step if the mixture still feels soft.
  • Cool before adding chocolate: This helps keep the chocolate chips from melting.
  • Use a sharp knife: A sharp knife produces cleaner cuts once the bars are fully chilled.
  • Keep the bars cool: Refrigeration helps them maintain their shape, especially in warmer conditions.
  • Adjust the texture carefully: Add dry ingredients or extra peanut butter gradually rather than making a large adjustment at once.
Homemade snack bars being pressed firmly into a parchment-lined pan for clean, sturdy slices.

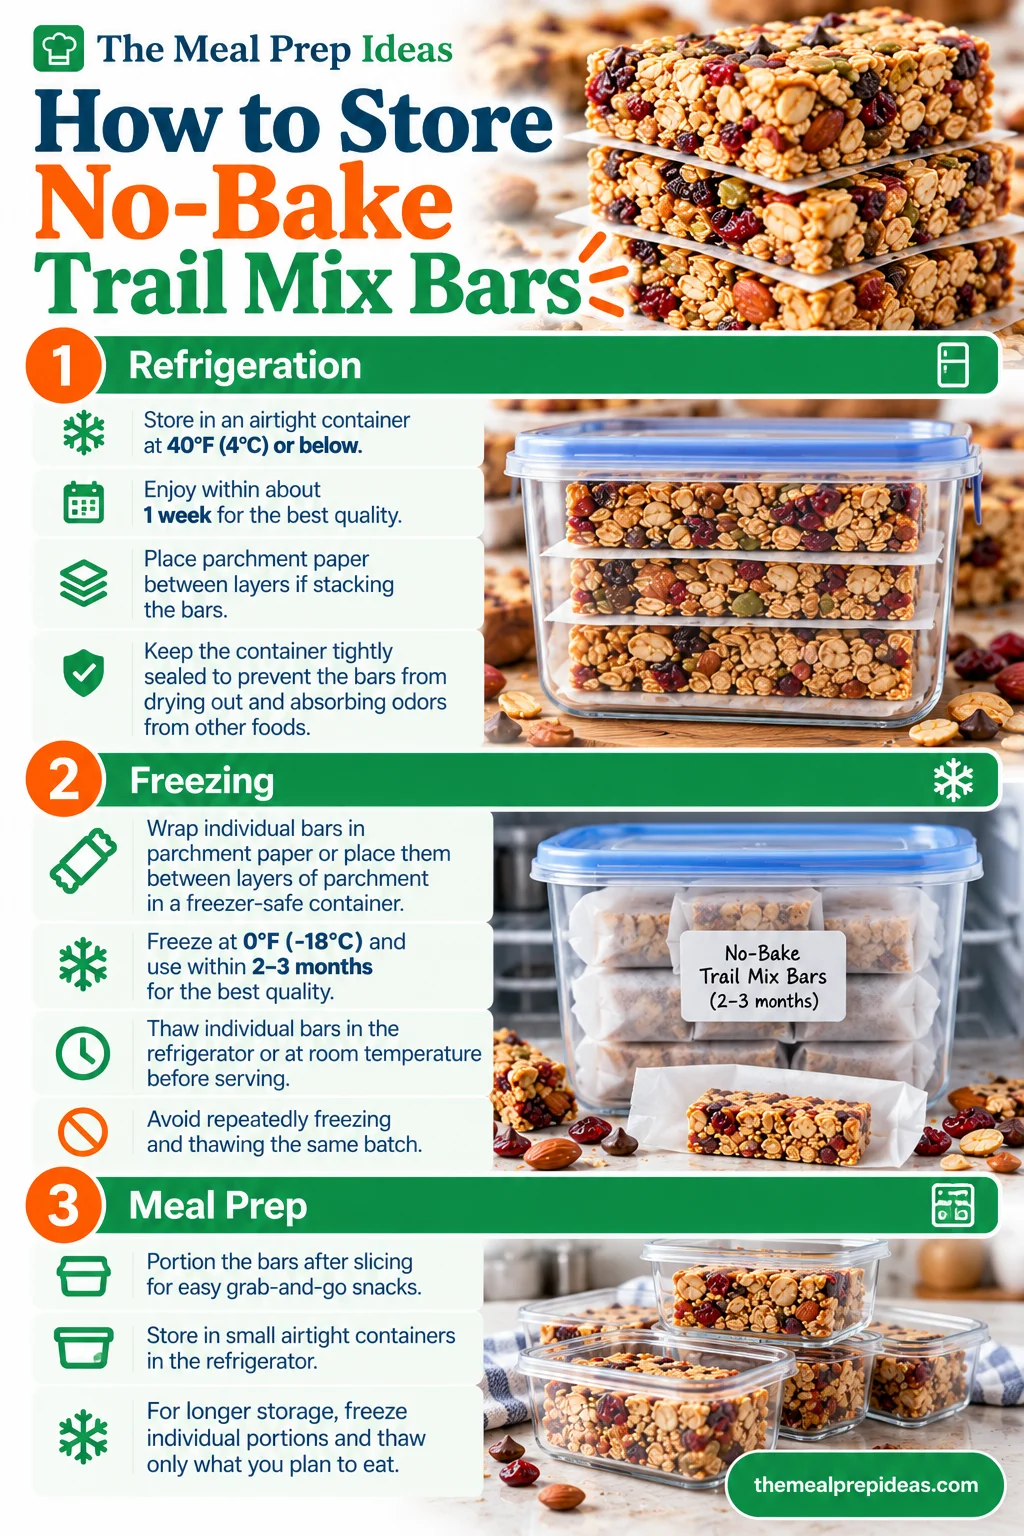
How to Store No-Bake Trail Mix Bars

Refrigeration

Place the sliced trail mix bars in an airtight container and refrigerate them at 40°F (4°C) or below.

For the best quality, enjoy them within about 1 week. Place parchment paper between layers if you stack the bars to prevent them from sticking together.

Keeping the container tightly sealed also helps protect the bars from drying out and absorbing odors from other foods in the refrigerator.

Freezing

No-Bake Trail Mix Bars freeze well and are useful for longer-term snack preparation. Wrap individual bars in parchment paper or place them between layers of parchment inside a freezer-safe container.

Freeze the bars at 0°F (-18°C) and use them within about 2–3 months for the best quality.

Thaw individual bars in the refrigerator or let them sit at room temperature for a short time before serving. Avoid repeatedly freezing and thawing the same batch.

Meal Prep

These bars are especially convenient for meal prep because one batch can be portioned into individual snacks.

After slicing, wrap each bar separately or place two or three bars into small airtight containers. Store them in the refrigerator and grab a portion whenever you need a quick snack.

For longer meal-prep storage, freeze individual portions and thaw only the number you plan to eat. If you prefer a smaller no-bake snack, try our Peanut Butter Oat Energy Bites for another convenient option to portion ahead.

Oat and fruit bars stacked with parchment paper in an airtight refrigerator container.

Frequently Asked Questions

Do No-Bake Trail Mix Bars Need to Be Refrigerated?

Refrigeration is recommended for the best texture and freshness, particularly because the bars contain peanut butter and honey. Store them in an airtight container at 40°F (4°C) or below. Keeping them chilled also helps the bars stay firm instead of becoming soft.

What Can I Add to Trail Mix Bars?

You can add a wide variety of ingredients, including almonds, walnuts, pecans, cashews, pumpkin seeds, sunflower seeds, chia seeds, dried cranberries, raisins, dates, coconut, chocolate chips, or cacao nibs. Add ingredients gradually so the total amount of dry ingredients does not overwhelm the binding mixture.

How Do I Keep No-Bake Bars from Falling Apart?

Press the mixture very firmly into the pan before chilling. The ratio of dry ingredients to peanut butter and honey is also important. If the mixture looks dry or crumbly, add a small amount of peanut butter or honey. Chilling the bars thoroughly before slicing also helps them hold their shape.

Can I Make Trail Mix Bars Without Nuts?

Yes. Replace the nuts and peanut butter with seeds and seed butter. Sunflower seed butter works particularly well as a peanut-free option, while pumpkin seeds, sunflower seeds, chia seeds, or hemp hearts can provide crunch and texture. Always check ingredient labels if the bars are being prepared for someone with a serious allergy.

How Long Do Homemade Trail Mix Bars Last?

Homemade trail mix bars generally keep for about 1 week in an airtight container in the refrigerator. For longer storage, freeze them for about 2–3 months for the best quality. Storage time can vary depending on the specific ingredients and any additional perishable ingredients added to the recipe.

No ratings yet

No-Bake Trail Mix Bars

Make easy No-Bake Trail Mix Bars with oats, nuts, seeds, dried fruit, peanut butter, and honey. A chewy, crunchy snack for meal prep.

No-Bake Trail Mix Bars made with oats, almonds, dried cranberries, and other wholesome ingredients.the meal
prep ideas
15 minPrep
1 hrCook
1 hr 15 minTotal
Makes 12Servings
Print recipe

Ingredients

0 of 13 gathered

How to prepare

  1. 1Prepare the pan: Line an 8-inch square baking pan with parchment paper, leaving some parchment hanging over two sides for easy removal later.
  2. 2Prepare the dry ingredients: Add the rolled oats, shredded coconut, chopped almonds, pumpkin seeds, sunflower seeds, dried cranberries, and raisins to a large bowl. Stir until evenly combined.
  3. 3Make the binding mixture: Add the peanut butter and honey to a small saucepan. Warm over low heat, stirring continuously, until the mixture becomes smooth and easy to stir. Do not bring it to a boil. Remove from the heat and stir in the vanilla, cinnamon, and salt.
  4. 4Combine everything: Pour the warm peanut butter mixture over the dry ingredients. Stir thoroughly until the oats, nuts, seeds, and fruit are evenly coated.
  5. 5Add chocolate chips: Let the mixture cool for a few minutes, then fold in the mini chocolate chips if using. Adding them while the mixture is slightly cooler helps prevent them from melting completely.
  6. 6Press into the pan: Transfer the mixture to the prepared pan. Use the back of a spoon, spatula, or another piece of parchment paper to press it down firmly and evenly. Pay extra attention to the corners and edges.
  7. 7Chill: Cover the pan and refrigerate for at least 1 hour, or until the mixture is firm enough to slice.
  8. 8Slice and serve: Lift the chilled mixture from the pan using the parchment paper. Place it on a cutting board and cut into 12 bars or smaller squares.

Good to know

  • Press firmly: Compacting the mixture is one of the most important steps for keeping the bars together.
  • Use thick peanut butter: A thick, creamy peanut butter provides better binding than a very runny variety.
  • Do not overheat the binding mixture: Gentle warming is enough to loosen the peanut butter and honey.
  • Let the mixture cool slightly: If adding chocolate chips, allow the mixture to cool first so they do not melt into the entire batch.
  • Customize the mix: Keep the overall amount of dry ingredients close to the recipe so the bars have enough binding mixture to hold together.
  • Use parchment paper: It makes removing the chilled mixture much easier.
  • Adjust the texture: If the mixture feels too dry before pressing, add a little more peanut butter. If it feels excessively wet, mix in a small amount of oats.
  • Nutrition estimate: Values are approximate per bar and are based on 12 servings, including the optional chocolate chips.
  • Almonds are used in the basic recipe, but you can replace them with chopped walnuts, pecans, cashews, pistachios, or peanuts.
  • For a softer texture, use finely chopped nuts. For more crunch, leave some pieces slightly larger. Toasted nuts can add a deeper flavor, but allow them to cool completely before mixing them into the recipe.
  • Dried cranberries and raisins provide a classic sweet-tart combination, but many other dried fruits work well.
  • Try chopped dates, dried cherries, apricots, mango, blueberries, or strawberries. Larger dried fruit should be chopped into small pieces so it distributes evenly throughout the bars.
  • If the dried fruit is especially sticky, toss the chopped pieces with a small amount of oats before mixing to help separate them.
  • Pumpkin and sunflower seeds can be replaced or combined with chia seeds, flaxseed, hemp hearts, or sesame seeds.
  • You can also add a small amount of puffed quinoa or crispy rice cereal for a lighter, crunchier texture. Keep the total dry ingredients reasonably close to the original amount so the bars still have enough binding mixture.
  • Mini chocolate chips are an easy way to add a little chocolate flavor. Dark chocolate chips, cacao nibs, or finely chopped dark chocolate can also work.
  • For additional flavor, try cinnamon, vanilla, cocoa powder, orange zest, or a small pinch of nutmeg. A little unsweetened coconut can also complement the nuts and dried fruit. For another bite-sized snack made with oats and peanut butter, try our Peanut Butter Oatmeal Balls, which are easy to prepare ahead.
  • Place the sliced trail mix bars in an airtight container and refrigerate them at 40°F (4°C) or below.
  • For the best quality, enjoy them within about 1 week. Place parchment paper between layers if you stack the bars to prevent them from sticking together.
  • Keeping the container tightly sealed also helps protect the bars from drying out and absorbing odors from other foods in the refrigerator.
  • No-Bake Trail Mix Bars freeze well and are useful for longer-term snack preparation. Wrap individual bars in parchment paper or place them between layers of parchment inside a freezer-safe container.
  • Freeze the bars at 0°F (-18°C) and use them within about 2–3 months for the best quality.
  • Thaw individual bars in the refrigerator or let them sit at room temperature for a short time before serving. Avoid repeatedly freezing and thawing the same batch.
  • These bars are especially convenient for meal prep because one batch can be portioned into individual snacks.
  • After slicing, wrap each bar separately or place two or three bars into small airtight containers. Store them in the refrigerator and grab a portion whenever you need a quick snack.
  • For longer meal-prep storage, freeze individual portions and thaw only the number you plan to eat. If you prefer a smaller no-bake snack, try our Peanut Butter Oat Energy Bites for another convenient option to portion ahead.
VegetarianVeganDairy-FreeGluten-FreeNut-FreeHigh-Fiber

Made this recipe?

Tag @themealprepideas on Instagram — we love seeing what you made.

Tag us

Reviews & Comments

Be the first to rate, review, or ask a question about this recipe.

No comments yet

Be the first cook to share feedback or ask a question about this recipe!

Leave a Review & Rating

Tap to rate

Comments are moderated for community safety. External links are filtered.

Keep Cooking

You Might Also Like

Peanut Butter Oat Energy Bites

Peanut Butter Oat Energy Bites

Make easy Peanut Butter Oat Energy Bites with oats, peanut butter, honey, and chia seeds. A chewy, no-bake snack ready in 40 minutes.

10 min
Get Recipe

Peanut Butter Granola Bars

Peanut Butter Granola Bars

Make easy Peanut Butter Granola Bars with oats, honey, peanut butter, seeds, and dried fruit. These chewy no-bake bars are perfect for meal prep.

15 min
Get Recipe

PB & J Energy Bites

PB & J Energy Bites

Make easy PB & J Energy Bites with peanut butter, oats, and berries. These chewy, no-bake snacks are perfect for meal prep and busy days.

10 min
Get Recipe

Get Your Free 7-Day Meal Prep Plan

Join 50,000+ subscribers getting weekly meal prep ideas, shopping lists, and time-saving tips straight to their inbox.

No spam. Unsubscribe anytime.